We’re thrilled to announce that Gemini in AppSheet Solutions is now available in Public Preview for Enterprise users! As announced during the AppSheet breakout session at Google Cloud Next 2025 just a few weeks ago, this powerful new capability allows AppSheet Enterprise Plus users to integrate Google’s Gemini models directly into their automation workflows.
Google recently announced some exciting developments for AppSheet, with the news that creators can now directly integrate Gemini AI capabilities into your AppSheet apps. While developers have previously found ways to connect AppSheet to Gemini including using Google Apps Script (like the invoice processing example using the GeminiApp library previously discussed on Pulse), this new update promises to make AI-powered automation accessible to everyone, no coding required.
What This Means for AppSheet Creators
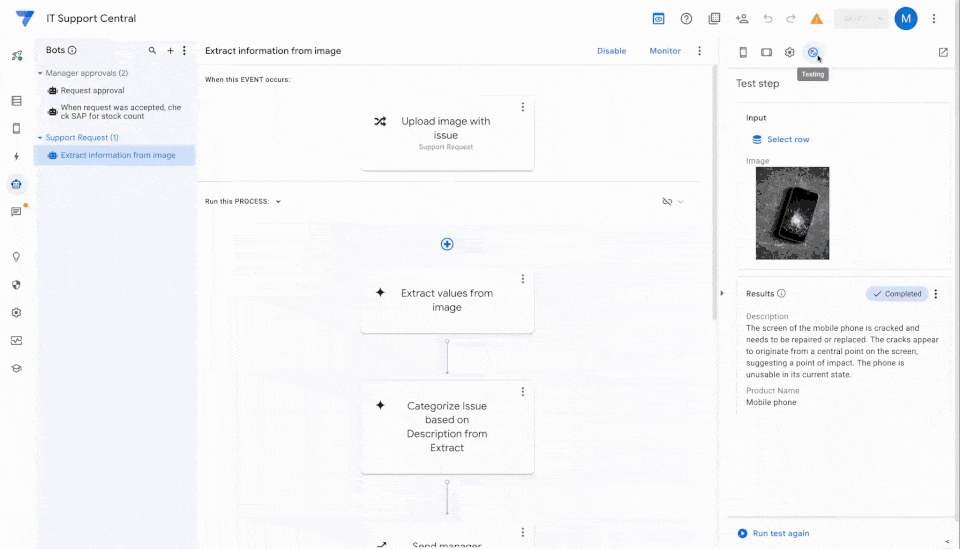
This move significantly lowers the barrier for integrating AI into AppSheet workflows. Instead of setting up API keys, writing Apps Script functions, and managing libraries like GeminiApp to call the Gemini API for tasks like data extraction, creators can now use a native AI Task step within AppSheet automations.
As highlighted in Google’s announcement, this new approach offers several advantages:
Simplified AI Integration: The native AI Task aims to handle jobs like extracting specific data from uploaded photos or PDFs and categorising text – directly within AppSheet. This replaces the need for external scripts for many common AI tasks.
Build with Confidence: The GA AI Task Step Testing feature allows creators to test and refine AI prompts and configurations directly in the editor using sample data before deployment, a crucial step for reliable AI.
No-Code Accessibility: By embedding Gemini capabilities directly, AppSheet makes powerful AI accessible to creators who may not have coding expertise.
Controlled Deployment & Oversight: Admins still control feature access, and workflows can still incorporate human review steps alongside the AI Task.
Potential Use Cases
Google suggests the AI task can be used for:
Information Extraction: Getting details from images (serial numbers, meter readings) or documents (PO numbers, tracking info, report details).
Record Categorisation: Classifying expenses, maintenance requests, or customer feedback automatically.
These are similar goals to what was achievable via Apps Script previously, but now potentially much simpler to implement directly in AppSheet.
A Big Step for No-Code AI
This native integration represents a significant simplification compared to earlier methods requiring Apps Script. By embedding Gemini directly into AppSheet automations, Google is making advanced AI capabilities much more accessible for business users of all levels.
For full details and setup instructions, refer to the official Google announcement and linked resources.
Tired of manually processing invoices? I recently built a demo that automates this tedious task using the power of Gemini, AppSheet’s new Gmail integration, and a custom Apps Script library. Let me show you how it works!
Here’s the setup:
Gmail Integration: AppSheet’s new Gmail integration allows you to trigger automations based on incoming emails. I’ve set it up to monitor a specific Gmail label called “Invoices”.
Apps Script Library: Using my “GeminiApp” (available on Github) which simplifies the interaction with Google’s Gemini AI models directly from Apps Script. This library handles the heavy lifting of making API calls and managing responses.
Controlled Generation: Gemini’s “Controlled Generation” feature lets me define a JSON schema that structures the AI’s output. This is key for extracting invoice data in a consistent, machine-readable format.
The Workflow:
Invoice Received: When an invoice email arrives and is labelled “Invoices”, AppSheet’s Gmail integration kicks in.
Automation Triggered: AppSheet triggers an automation that calls a custom Apps Script function called jsonControlledGeneration.
Data Extraction: The jsonControlledGeneration function uses the GeminiApp library to send the email body to Gemini with a predefined JSON schema for invoice data.
Structured Output: Gemini processes the email content and extracts the relevant invoice details (e.g., invoice number, supplier name, date, amount) in a JSON format that adheres to the schema.
Downstream Processing: The structured JSON output can then be easily returned to the AppSheet automation for further actions, such as automatically populating your data table, updating a database, or triggering a payment process.
If you would like to try this yourself, instructions are provided below.
Want to try it yourself?
To set this demo up you will either need a Google AI Studio API key or a Google Cloud project with Vertex AI enabled. Information on both these setups is included in the GeminiApp Setup Instructions. Once you have these you can follow these steps:
Open the Invoice Tracker template and click ‘Copy and Customize’, then click OK on the Error Creating App: Apps Script function is invalid error
Navigate to appsheet.com and from your ‘recent’ apps open the ‘Invoice Tracker’ app
Open Automations and for the ‘New Invoices’ event under the Gmail Event Source, click Authorize, then
In the ‘Add a new data source’ enter a name e.g. Invoices Trigger, click the Gmail button and follow the authentication steps
Once complete in the AppSheet Automation settings select your Gmail account and a Label to watch
In the Process section click on the GeminiApp task and click on the blue file icon, then select your copied version of the Apps Script project and click Authorize
Once Authorize, from the Function Name select jsonControlledGeneration
Step 7: Click on the blue file icon, then select your copied version of the Apps Script project
The Power of Controlled Generation
Controlled Generation is a powerful way for extracting information from unstructured data like emails. By defining a JSON schema, I can specify exactly what information I want Gemini to extract and how it should be structured. This ensures that the output is consistent and reliable, eliminating the need for manual cleanup or post-processing.
Here’s an example of a simple JSON schema for invoice data:
 const schema = {
    "type": "object",
    "properties": {
      "Invoice Reference": {
        "type": "string",
        "description": "Unique identifier for the invoice"
      },
      "Supplier Name": {
        "type": "string",
        "description": "Name of the supplier"
      },
      "Invoice Date": {
        "type": "string",
        "description": "Date the invoice was issued",
        "format": "date"
      },
      "Due Date": {
        "type": "string",
        "description": "Date the invoice is due",
        "format": "date"
      },
      "Invoice Amount": {
        "type": "number",
        "description": "Total amount due on the invoice"
      },
      "Notes": {
        "type": "string",
        "description": "Additional notes related to the invoice",
        "nullable": true
      }
    },
    "required": ["Invoice Reference"]
  }
Creating JSON Schemas with Gemini
Creating JSON schemas can seem a bit daunting at first, but Gemini can actually help you with that too! If you have sample data in a Google Sheet, you can use the Gemini Side Panel to generate a schema automatically. Just highlight the data and ask Gemini to create a JSON schema for you. You can even provide a description for each property to make your schema more understandable. Below is a prompt you can use in the Gemini Sheet Side Panel to generate a schema for your own data:
I'm using Controlled Generation with the Gemini API as described in the document https://drive.google.com/file/d/1ETKHlEUDQzJ-f2fmAzsuDjcwdt1D7R2y/view?usp=drive_link

I need help creating a JSON schema to capture data from a screen.

Could you generate a JSON schema suitable for using Controlled Generation with the Gemini API? I want to extract specific information from what's displayed on my screen.

Here are my requirements:

* **Comprehensive Schema:** The schema should be designed to capture a variety of relevant data points from the screen.
* **Detailed Descriptions:** Please include a clear and concise \`description\` for each \`property\` in the schema. This will help me understand the purpose of each field.
* **Format Specification:** If any columns contain date or datetime data, please use the \`format\` field to specify the appropriate format (e.g., "date", "date-time"). This is crucial for accurate data parsing.
* **Output Example:** Please provide the schema in the following format:

```
const schema = {
  description: "Description of the data",
  type: "array", // or "object", depending on the structure
  items: { // If type is array
    type: "object",
    properties: {
      propertyName: {
        type: "string", // or other appropriate type
        description: "Description of the property",
        format: "date", // or "date-time", if applicable
        nullable: false, // or true
      },
      // ... more properties
    },
    required: ["propertyName"], // If any properties are required
  },
  properties: { // If type is object
      propertyName: {
        type: "string", // or other appropriate type
        description: "Description of the property",
        format: "date", // or "date-time", if applicable
        nullable: false, // or true
      },
      // ... more properties
    },
    required: ["propertyName"], // If any properties are required
};
```
Limitations and future developments
While the beta Gmail integration in AppSheet marks a significant new feature, it’s important to note a current limitation is support for processing email attachments. Currently, the integration focuses on metadata such as sender name, subject, and message body, but the AppSheet team have acknowledged attachment support will be added in the near future.
Looking ahead, at Google Cloud Next 2024 the AppSheet team announced an upcoming “Gemini Extract” feature, currently in private preview. This feature intends to include a native Gemini ‘controlled generation’ feature which would let app creators select the data fields they would like populated from sources including images and text. This should be a more intuitive approach to data extraction, directly integrating Gemini capabilities into AppSheet. The Next video includes a Google URL to sign up to the Gemini Extract feature https://goo.gle/appsheet-previews?r=qr
Summary
The Invoice Tracker example hopefully highlights the opportunity for streamlined solutions with data extraction with AppSheet’s Gmail integration, Gemini, and Apps Script.The GeminiApp library also simplifies the integration of Google’s Gemini AI models into Google Workspace, providing developers with tools to create sophisticated AI-powered applications.
Using the structured JSON output with Controlled Generation can help AppSheet creators by making it easier to ensure you get the data back in a suitable format including the type of data you need, such as dates. With the GeminiApp library, rapid prototyping is achievable, in the ‘Invoice Tracker’ example I was able to get a functional prototype up and running in under 30 minutes.
AppSheet’s Gmail integration, generally available to all AppSheet and Google Workspace Core users, can trigger automations directly from incoming emails without requiring app deployment. Combined with Apps Script functions this opens the door to some powerful opportunities for AppSheet creators. Integrating Gemini-powered AI extraction with AppSheet and Apps Script provides an innovative solution for automating data extraction from emails. By taking advantage of these capabilities, citizen developers can create efficient and user-friendly solutions.
We’re pleased to announce the public preview of Gmail integration with AppSheet – something we know has been a longstanding community request. With this preview launch, your Gmail inbox can seamlessly connect to the full breadth of downstream processes AppSheet automation already offers.
AppSheet has introduced a Gmail integration in public preview, offering a workaround for situations including third-party applications that lack direct integration with Google Workspace via add-ons or APIs. With this new feature users can now connect their Gmail inboxes to AppSheet, enabling incoming emails to trigger various automations.
How it Works
Users can link their AppSheet apps to authorized Gmail accounts and select specific labels in their Gmail inboxes for monitoring. When an email arrives with a designated label, AppSheet receives information about the email, including the sender, subject, and body. This information can then be used to automate various tasks and processes within the AppSheet platform.
Things to Note
Currently, the beta release does not include support for attachments, but AppSheet is working on adding this feature for the full release later this year. Also, Gmail cannot be used as a full data source in AppSheet. To save Gmail messages in an app table, users need to create a process to add the email data.
Availability and Feedback
The Gmail integration is rolling out to all AppSheet users soon as part of the preview and the AppSheet team is encouraging users to provide feedback on this new integration. To read more and provide feedback follow the source link
Let’s see whether Google’s AI Studio can teach me how to build a pivot table in Google Sheets. It’s wild how fast this technology is progressing and this gives us a glimpse into the near future when we’ll all have personal AI assistants helping us work more efficiently.
In a recent YouTube video, Ben Collins, a prominent figure in the Google Sheets community, explored the capabilities of Google’s AI Studio by using it to guide him through the process of creating a pivot table. This experiment provides a compelling glimpse into the future of how we might interact with software, suggesting that AI could soon enable conversational, real-time interactions that go beyond the traditional user-driven model.
Ben began by logging into Google AI Studio and initiating a real-time screen share of his Google Sheet, which contained real estate data. He then engaged the AI assistant, powered by Gemini, to help him create a pivot table to analyze this data. The initial request was straightforward: to see the sum of sales prices broken down by property type. The AI assistant demonstrated an understanding of this request and provided step-by-step instructions. The AI correctly instructed Ben to start by selecting any cell within his data and then navigating to the Insert menu to select “Pivot table”.
The AI assistant did stumble initially, incorrectly stating that the pivot table option could be found under the Data menu. This highlights an important point: while impressive, AI assistants are not yet infallible. As Ben pointed out in the video, that could be a stumbling block if someone didn’t know to look under the Insert menu. Ben’s familiarity with Google Sheets allowed him to identify and correct the AI’s misstep, and continue with the tutorial. This shows that even with sophisticated AI tools, a foundational understanding of the software is still essential.
Once the pivot table was created, the AI guided Ben through adding “property type” to the rows and “sales price” to the values section. It also prompted Ben to ensure the summarization of sales price was set to “sum” instead of “count” or another option. This highlights the AI’s ability to understand the nuances of data analysis in Google Sheets and guide users to the correct settings. This is a key insight, because the AI isn’t just providing instructions but it is also understanding the data context.
Ben’s experiment provides a vision of a future where AI agents become sophisticated collaborators within Google Sheets. These agents would not only provide step-by-step instructions, but could also actively carry out tasks, such as reformatting tables or creating charts and graphs based on conversational prompts. Imagine, for example, saying “reformat this table to be more visually appealing” or “create a chart showing sales trends over time” and having the AI make those changes automatically. This would move beyond current user workflows which depend on menu clicks, or even hand-written Apps Scripts, and would allow users to focus on high-level goals and analysis, rather than the mechanics of the software.
It is clear from the video that Google AI is an important area to watch for the future of Google Workspace. However, even with AI integration, it is still important to understand the tools you are using to ensure the advice you are receiving is correct. This is an important point, as it shows that AI should be seen as a helpful assistant, not as a replacement for user understanding. If you are interested in reading more about this I recently published an article on Empowering Enterprise Productivity While Preserving Critical Thinking.
Quickly append new permissions to existing files within Google Drive. Insert email addresses using a comma-space format with optional notifications.
Quickly append new file permissions via a Google Sheet
The following Google Apps Script tool allows you to quickly append new permissions to existing files within Google/Shared drive. This is quite a niche tool so it is anticipated you would already have a Google Sheet of file IDs/URLs, though there is the option to select an existing Drive folder of files and automatically bring them into this tool.
By inserting email addresses using a comma-and-space format you can optionally select to send a notification email to the new user(s)
You can continue to append further rows to the Google Sheet as existing ones will be skipped once the ‘Status’ column has automatically been marked as ‘Completed’. Alternatively you can clear the Sheet each time for a fresh start.
I use Google Apps Script to support staff and students in my job. I enjoy dabbling with creating tools to help with automation and I freely share my learning experiences on my blog, where I also have a number of useful Google Add-ons: www.pbainbridge.co.uk
Enhance your Google Sheets skills with this Visual Vocabulary template. Learn how to choose the right charts, create effective visualizations, and design professional-looking dashboards. This comprehensive guide includes 31 common chart types, tips for data organization, and step-by-step instructions for using the SUBTOTAL formula to create interactive “Show/Hide” rows. Perfect for data enthusiasts and spreadsheet users of all levels!
Friend and fellow GDE, Ben Collins, has recently announced a new ‘Sheets Insiders’ membership program where he’ll be sharing some exclusive members-only newsletters, new templates, deep-dive tutorials, and more for both Google Sheets and Apps Script.
If you would like to ‘try before you buy’ Ben has shared the first issue of the Sheets Insiders membership program, featuring a Visual Vocabulary template for Google Sheets. The template is designed to help you in chart selection and the accompanying videos include lots of great tips to help you cleanly format your spreadsheets.
Future Sheets Insiders issues will delve into chart tricks, dropdown menus, interactive elements, AI and Sheets integration, formula challenges, and Apps Script content. The newsletter content will be archived in the Sheets Insiders Content Library for future reference. Click through to read more about Sheets Insiders and get your copy of the Google Sheets Visual Vocabulary Template.
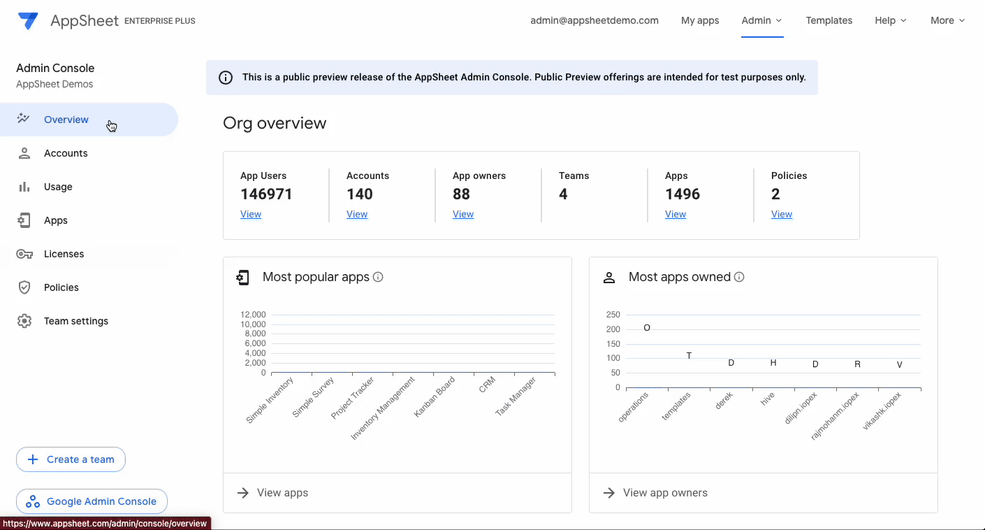
Workspace admins with the AppSheet service privilege now have visibility into the activities of their users, apps and licenses via the new AppSheet Admin Console
The Google AppSheet team recently announced the public preview of a new AppSheet Admin Console. The new Console gives Workspaces Admins greater visibility of AppSheet usage within their domain, including AppSheet Core users. The new Console is a big step forward in providing admins a centralized platform to monitor and manage AppSheet usage, licensing, and governance.
Key features include:
Insights into popular apps and top creators
Detailed app ownership and usage data
Comprehensive view of app users across the organization
Easy access to app sharing settings, performance, audit history, and version history
Exportable lists of accounts, users, apps, and licenses
User role management within the organization
Verification of AppSheet licenses (purchased, assigned, and used)
Access to usage monitoring data, even without an enterprise license
The linked announcement page also highlights some planned new features for the new Console include: historical app usage, individual app copy or transfer, self-serve provisioning, external user licensing, and a default organization model for new Workspace customers who purchase AppSheet Enterprise.
A key addition to the new Console is the AppSheet licensing summary. There are some important considerations Admins should start thinking about around AppSheet licenses, in particular, the creation or sharing of AppSheet apps with Enterprise features to unlicenced or Core users.
Previously under the legacy Team licensing model it was possible for an AppSheet Core user to create and share apps with AppSheet Enterprise features. As Google moves to an assigned model Admins will need to reconcile the required licenses for their domain. The good news is Google has said
“In the short team, no users will be blocked. Admins will be given several months advanced notice before stricter license enforcement.”
I recently explored the transformative power of Generative AI (GenAI) and how it’s reshaping the business landscape in a thought leadership piece for my employer, Appsbroker | CTS. Drawing from my experience in Gemini for Workspace pilots and custom GenAI solutions using the Gemini API in Vertex AI, I highlighted how AppSheet, a no/low-code platform, can be a game-changer.
AppSheet simplifies the integration of GenAI capabilities, enabling rapid prototyping and tailored solutions that deliver real-world results, whilst still benefiting from integrations into Google Workspace. I believe it’s a cost-effective and impactful way to harness GenAI’s potential without blowing the budget. In the article, I share some examples and the benefits of using AppSheet for GenAI innovation.
Curious to learn more? Join me at the Google Workspace Developer Summit in Berlin on September 17th, where I’ll be discussing AppSheet integrations, Gemini Function Calling, and more.
This comprehensive guide walks you through connecting AppSheet to Google Cloud SQL, step-by-step. Unlock the power of a scalable and secure database to build powerful, data-driven mobile applications. Learn everything you need to know, from setting up Google Cloud SQL server, setting up the MySQL database as the datasource for AppSheet Apps, the connection to leveraging Cloud SQL for seamless data management in your AppSheet projects. If you are an AppSheet app creator or developer, this tutorial will likely be the best practice for you during the process of working with Google Cloud SQL
Google AppSheet GDE, Vo Tu Duc, has published a comprehensive guide on connecting AppSheet to Google Cloud SQL. Google provides a very useful support page on AppSheet data sources and performance, which highlights some scenarios where you might need to consider Cloud SQL.
For example, large-scale AppSheet apps using Google Sheets as a datasource with significant data access during specific times of the day, could encounter concurrency or quota issues imposed by the Sheets API. Using Cloud SQL you can configure your own instance configured to match your AppSheet app requirements avoiding any quota limits.
The guide provides very detailed step-by-step instructions for setting up Google Cloud SQL, creating a MySQL database, and connecting it to AppSheet. This includes lots of annotated screenshots, making it easy to follow even for those who are new to Google Cloud, MySQL, and SQL queries. Whilst the guide assumes you are creating a new app if you copy an existing app to an SQL database and then, if needed, upgrade the existing app.
One final thing to note is Cloud SQL isn’t part of the standard data integrations offered with AppSheet Starter and Core editions. As a result, all your app users will require AppSheet Enterprise licenses. Here is a summary of features that are supported with each subscription.
If your automations are not being triggered by Google Form submissions, Pablo Felip’s tip is it could be because your Google Workspace Admin has turned on AppSheet Core Security.