AppSheet Custom Steps for Google Workspace Studio

Before we jump in a quick backstory, if nothing else to prove this entire post wasnโ€™t written with Gemini assistance. Just over a year ago I was fortunate to be a Workspace Studio tester (or Flows as was it called then). I was particularly excited by the ability of Extending Google Workspace Flows with Custom Steps using Google Apps Script. As Workspace Studio moved through the Gemini Alpha program to general availability, custom steps disappeared. This is very understandable given Workspace Studio was a new product and Google wanted to make sure users got to access a stable platform. The great news Google has now launched Automate workflows with custom starters and steps, third-party integrations, and webhooks in Workspace Studio.

With custom steps officially back I thought it was revisit an integration I had been experimenting with combining Workspace Studio with AppSheet. The code for this solution is published in the AppSheet Custom Steps for Google Workspace Studio repo and in this post, we’ll walk through:

  1. Why connect Workspace Studio to AppSheet?
  2. A Real-World Example: Intelligent IT Ticket Triage with Gemini & AppSheet
  3. How custom steps are structured in Apps Script (appsscript.json)
  4. The secret sauce: Dynamic schema discovery via Custom Resources
  5. Handling Single vs. Multiple Results: A Two-Tier Approach
  6. Testing & Deployment with Clasp (and the Admin Setting gotcha)
  7. How this project was built using AI coding agents with .agents/ skills

Why Connect Workspace Studio and AppSheet?

Google Workspace Studio is great for automations across Google Workspace allowing you to use Gemini assistance. AppSheet serves as a no-code application platform making it easy to create solutions for your business data. AppSheet Enterprise customers can already use Gemini AI automations to extract, categorise and summarize data, but getting data from a Workspace automation into AppSheet often required intermediary webhooks, custom API scripts, or relying on Google Workspace integrations to Sheets, Forms and Gmail.

With my custom Studio steps, powered by the AppSheet REST API, you have the ability to extend your apps capabilities using the growing list of Workspace Studio starter steps integrating with your AppSheet app to:

  • Add Rows: Directly push structured records into AppSheet tables.
  • Update Rows: Modify records and trigger AppSheet bot workflows in real time.
  • Find Rows: Run AppSheet formula expressions (such as FILTER("Technicians", [On Call] = TRUE)) and feed those records back into downstream Studio steps.

A Real-World Example: Intelligent IT Ticket Triage with Gemini & AppSheet

To see how this works in practice, let’s look at a common scenario, an automated IT helpdesk flow using a slightly modified version of the AppSheet standard IT Ticketing template.

In the IT Ticketing app the schema includes:

  • The Tickets table tracks issues (Issue ID, First Name, Last Name, Email, Description, Symptom, Assigned Tech, Date Created, Resolved).
  • The Technicians table tracks staff (Name, Department, IT Email, On Call boolean, and Can Cover skills: General Issues, Network, Website, Apps). The primary key for this table is IT Email.
  • The Symptoms table stores the allowed categories (Name, Department), used as an AppSheet Ref dropdown in the app.

Rather than forcing users to fill out a form manually or relying on rigid routing rules, we can combine Workspace Studio’s Gmail starter, Gemini steps, and our AppSheet custom steps into an autonomous triage pipeline:

[ Gmail Starter: New Support Email ]
                 โ”‚
                 โ–ผ
[ Step 2 : Find Rows (Fetch On-Call Technicians) ]
                 โ”‚
                 โ–ผ
[ Step 3: Find Rows (Fetch the apps Symptoms list) ]
                 โ”‚
                 โ–ผ
[ Step 4: Extract (Gemini extracts the required data for our app) ]
                 โ”‚
                 โ–ผ
[ Step 5: Add Rows (Create Ticket with Assigned Tech) ]

Step-by-Step Flow Breakdown

  1. Starter (Gmail): Studio listens for incoming emails sent to [email protected] or flagged with [IT Support] in the subject line.
  2. AppSheet Custom Step (Find Rows):
    • Studio queries the Technicians table with the selector:FILTER("Technicians", [On Call] = TRUE)
  3. AppSheet Custom Step (Find Rows):
    • Studio queries the Symptoms table for the current list
  4. Gemini Extract (Smart Triage):
    • Studio passes both the cleaned ticket details, the on-call technician records and our apps symptoms list to Gemini:
  1. AppSheet Custom Step (Add Rows):
    • Studio inserts the new record into Tickets.
    • The step outputs addedRow, immediately exposing newly generated fields (like Ticket ID or calculated dates) for the rest of the flow.
 [
   {
     "Name": "{{Step 1.Starter.Sender Display Name}}",
     "Email": "{{Step 1.Starter.Sender Email}}",
     "Description": "{{Step 4.Gemini.Description}}",
     "Symptom": "{{Step 4.Gemini.Symptom}}",
     "Assigned Tech": "{{Step 4.Gemini.IT Email}}"
   }
 ]

This pattern demonstrates the true power of combining Workspace Studio and AppSheet. Studio orchestrates Workspace events and AI reasoning, while AppSheet provides validated, related business data.


The Anatomy of a Workspace Studio Custom Step

Under the hood, a Workspace Studio custom step is an extension of the Google Workspace Add-on architecture defined in appsscript.json.

Each step declares its inputs, outputs, and two primary Apps Script callback functions:

  1. onConfigFunction: Renders the configuration card displayed in the Studio sidebar when a user selects your step.
  2. onExecuteFunction: Receives input variable bindings at runtime, executes the business logic, and returns output variables back to the flow.

Here is an extract from appsscript.json defining the “Add Rows” step, featuring both bulk JSON outputs and the Dynamic Custom Resource (addedRow):

{
  "id": "appsheet_add_rows",
  "state": "ACTIVE",
  "name": "Add Rows in AppSheet",
  "description": "Adds one or more rows to a specified AppSheet table.",
  "workflowAction": {
    "inputs": [
      { "id": "appId", "cardinality": "SINGLE", "dataType": { "basicType": "STRING" } },
      { "id": "accessKey", "cardinality": "SINGLE", "dataType": { "basicType": "STRING" } },
      { "id": "tableName", "cardinality": "SINGLE", "dataType": { "basicType": "STRING" } },
      { "id": "rowsData", "cardinality": "SINGLE", "dataType": { "basicType": "STRING" } }
    ],
    "outputs": [
      {
        "id": "addedRow",
        "description": "The first newly added row with individual column fields.",
        "cardinality": "SINGLE",
        "dataType": {
          "resourceType": {
            "workflowResourceDefinitionId": "appsheet_row_resource"
          }
        }
      },
      {
        "id": "addedRows",
        "description": "The full rows added, including server-computed values.",
        "cardinality": "SINGLE",
        "dataType": { "basicType": "STRING" }
      }
    ],
    "onConfigFunction": "onConfigAddRows",
    "onExecuteFunction": "onExecuteAddRows"
  }
}

Notice that addedRow has a dataType pointing to appsheet_row_resource. At the top level of addOns.flows, we declare this custom resource alongside a dynamic definition provider:

"workflowResourceDefinitions": [
  {
    "id": "appsheet_row_resource",
    "name": "AppSheet Row",
    "providerFunction": "onDynamicAppSheetRowProvider",
    "resourceType": "DYNAMIC"
  }
],
"dynamicResourceDefinitionProvider": "onDynamicAppSheetRowDefinition"

Dynamic Schema Discovery via Custom Resources

One challenge with database integrations in no-code flow builders is usability. Asking users to hand-write raw JSON payloads or use secondary “Extract” steps to parse out field names isn’t straightforward.

Initially, I tried adding interactive buttons in the configuration card (e.g. a “Fetch Columns” button). However, Google Workspace Studio does not currently display interactive CardService action buttons or in-place card replacement widgets.

Whilst it is not possible to dynamically add input fields to a step, you can dynamically expose the outputs using Dynamic Custom Resources. With Dynamic Custom Resources, you can dynamically update the schemas to define individual column variables automatically.

How it Works Behind the Scenes

  1. Design-Time Schema Introspection (onDynamicAppSheetRowDefinition):
    When the user configures the step in Studio (entering their App ID, Access Key, and Table Name), Studio calls onDynamicAppSheetRowDefinition(e). Apps Script queries AppSheet using TOP(FILTER("Table", TRUE), 1) to discover existing column headers, registering each as an individual ResourceField:
function onDynamicAppSheetRowDefinition(e) {
  const resourceDefinitions = AddOnsResponseService.newDynamicResourceDefinition()
    .setResourceId("appsheet_row_resource");

  const inputs = e.workflow?.resourceFieldsDefinitionRetrieval?.inputs || {};
  const appId = inputs.appId?.stringValues?.[0];
  const accessKey = inputs.accessKey?.stringValues?.[0];
  const tableName = inputs.tableName?.stringValues?.[0];

  if (appId && accessKey && tableName) {
    const AppSheet = new AppSheetApp(appId, accessKey);
    // Fetch schema sample (cached for 6 hours to keep editor fast)
    const sample = AppSheet.Find(tableName, [], { "Selector": `TOP(FILTER("${tableName}", TRUE), 1)` });
    if (sample && sample.length > 0) {
      Object.keys(sample[0]).forEach(colName => {
        resourceDefinitions.addResourceField(
          AddOnsResponseService.newResourceField()
            .setSelector(colName)
            .setDisplayText(colName)
        );
      });
    }
  }

  const workflowAction = AddOnsResponseService.newResourceFieldsDefinitionRetrievedAction()
    .addDynamicResourceDefinition(resourceDefinitions);

  return AddOnsResponseService.newRenderActionBuilder()
    .setHostAppAction(AddOnsResponseService.newHostAppAction().setWorkflowAction(workflowAction))
    .build();
}

  1. Step Execution & Caching (onExecuteFunction):
    When the step runs, it executes the AppSheet API operation, caches the row data in CacheService under a unique UUID ("row_find_" + Utilities.getUuid()), and returns a resource reference variable alongside the standard JSON output:
const variables = {
  "firstRow": AddOnsResponseService.newVariableData().addResourceReference(resourceId),
  "foundRows": AddOnsResponseService.newVariableData().addStringValue(JSON.stringify(foundRows)),
  "rowCount": AddOnsResponseService.newVariableData().addIntegerValue(foundRows.length)
};

  1. Runtime Value Resolution (onDynamicAppSheetRowProvider):
    When a downstream step references a chip like Step 2 > First row > IT Email, Studio calls onDynamicAppSheetRowProvider(e) with the resourceId. The provider grabs the cached row and returns the requested column values on the fly.

Handling Single vs. Multiple Results: A Two-Tier Approach

When building steps that interact with databases, you inevitably face a question: What happens if the query returns one row versus ten rows versus zero rows?

In Google Workspace Studio’s currently, custom resources strictly mandate "cardinality": "SINGLE":

“The output variable has a dataType with the property resourceType. The value of cardinality must be SINGLE.”

Because Studio does not yet support repeated arrays of custom resource chips, our custom steps implement a two-tier output design:

StepOutput VariableType & CardinalityBest ForBehavior
Find RowsfirstRowDynamic Custom Resource (SINGLE)Single result / First matchExposes individual column chips (Email, Name, ID, etc.) directly to downstream steps.
foundRowsString (JSON Array) (SINGLE)Multiple resultsContains the full JSON array [ {...}, {...} ] of all matching rows.
rowCountInteger (SINGLE)Conditionals & branchingThe total number of rows found (0, 1, 5, etc.).
Add RowsaddedRowDynamic Custom Resource (SINGLE)Single record addedExposes column chips of the newly created row (useful for generated IDs or computed columns).
addedRowsString (JSON Array) (SINGLE)Bulk additionsFull JSON array of all rows inserted.
Update RowsupdatedRowDynamic Custom Resource (SINGLE)Single record updatedExposes column chips of the updated record.
updatedRowsString (JSON Array) (SINGLE)Bulk updatesFull JSON array of all updated rows.

How Flows Use This in Practice:

  • Single Record Workflows: Use firstRow, addedRow, or updatedRow chips directly in downstream steps (Gmail, Google Docs, Slack, Chat) without any formula or extraction step. If 0 rows match, chips safely resolve to empty strings ("").
  • Multi-Record Collections: Pass foundRows (JSON string) directly into the rowsData input of another step or iterate over the collection using Studio list actions.
  • Conditional Logic: Add a Studio branch on rowCount > 0 to safeguard downstream actions when records might not exist.

Testing & Deployment with Clasp

Because Studio custom steps run on Google Workspace Add-on infrastructure, testing is fast:

  1. Either Copy with Apps Script project or follow the steps to clone the repo and push via clasp:
  2. Install the Test Deployment: Open the Apps Script project, go to Deploy > Test deployments, select Google Workspace Add-on, and click Install.
  3. Use in Studio: Head to studio.workspace.google.com, add a step to any flow, and search for “AppSheet Utilities for Studio”.

[!IMPORTANT] Admin Setting Required for Google Workspace Accounts:
As announced in the Google Workspace Updates, custom steps are OFF by default for Google Workspace accounts.

If you see a lock icon stating “๐Ÿ”’ Access to these steps is restricted by your Workspace admin”, have a domain admin navigate to:
Google Admin Console > Apps > Google Workspace > Settings for Workspace Studio > Custom steps settings
Turn custom steps ON and check “Allow unpublished (test) custom steps”.

AI-Assisted Development with .agents/

An interesting aspect of developing for newly released or evolving APIs like Workspace Studio is that public LLMs often have knowledge cutoffs or hallucinate manifest formats and Card Service specifications.

To build this project efficiently, the repository includes a curated .agents/ directory containing specialized runbooks, rules, and reference specs:

  • Contract Parity: Enforces that input/output IDs in appsscript.json match Code.js execution handlers.
  • Real-time API Adaptation: When testing revealed that Studio sidebar cards don’t render interactive card buttons, the agent used the reference docs to quickly pivot to native Dynamic Custom Resources (dynamicResourceDefinitionProvider).
  • Platform Constraints: Encodes crucial platform invariantsโ€”like the requirement that dataType.resourceType outputs mandate "cardinality": "SINGLE"โ€”saving hours of trial and error.
  • AppSheet Selectors: Pre-validated AppSheet formula expressions (FILTER, SELECT, TOP) for REST API calls.

When working with tools like Gemini Code Assist or AI coding agents, these in-repo skills guide the model to write accurate, production-ready code on the first attempt and navigate rapid API evolutions.

Summary and Next Steps

Having custom steps and starters back in Workspace Studio opens up huge possibilities for developers. Google Apps Script acts as the glue code, letting you build custom integrations for internal systems, specialized SaaS platforms, or databases like AppSheet.

You can find the complete source code and clasp setup instructions on GitHub: ๐Ÿ‘‰ mhawksey/appsheet-custom-studio-step-example
Adding a Spark of Intelligence to Google Workspace: Exploring Gemini Managed Agents and the Google Workspace CLI

Gemini Spark, announced at Google I/O 2026, was launched as “your 24/7 personal AI agent that helps you work more efficiently by autonomously taking action on your behalf, under your direction… Spark operates in a fully managed, secure runtime on Google Cloud, meaning you get enterprise-grade security without ever having to manage the underlying infrastructure.”

If you have access to Gemini Spark, you will already know it has deep integrations to read and write your Google Workspace data. Like most of Google’s products, the infrastructure used by Gemini Spark is also accessible to developers. In the case of Gemini Spark, a key component is Managed Agents:

Managed agents on the Gemini API give you a configurable agent harness. A single API call provisions a Linux sandbox where the agent reasons, executes code, manages files, and browses the web autonomously.

The particular flavour of Managed Agents I was interested in was:

Antigravity agent: General-purpose managed agent powered by Gemini 3.7 Flash. Runs code, manages files, and searches the web inside a secure Linux sandbox hosted by Google. You can extend it with your own instructions, skills, and data to build a custom agent.

To replicate Gemini Spark’s integration with Google Workspace, this demo project installs the Google Workspace CLI (gws) into an agent orchestrated from a Google Apps Script web app.

Turning Raw Drive Docs into Executive Briefings

The setup is deliberately modest. Imagine a Google Drive folder containing raw Google Docs. in my case, copies of Google Workspace Updates and Gemini Enterprise announcements. I want to convert this growing folder into structured, evidence-backed briefings for Workspace developers and business stakeholders, a clean source register, and visual summaries.

Setup

This repo has all the code you need to deploy this demo. In terms of what it does:

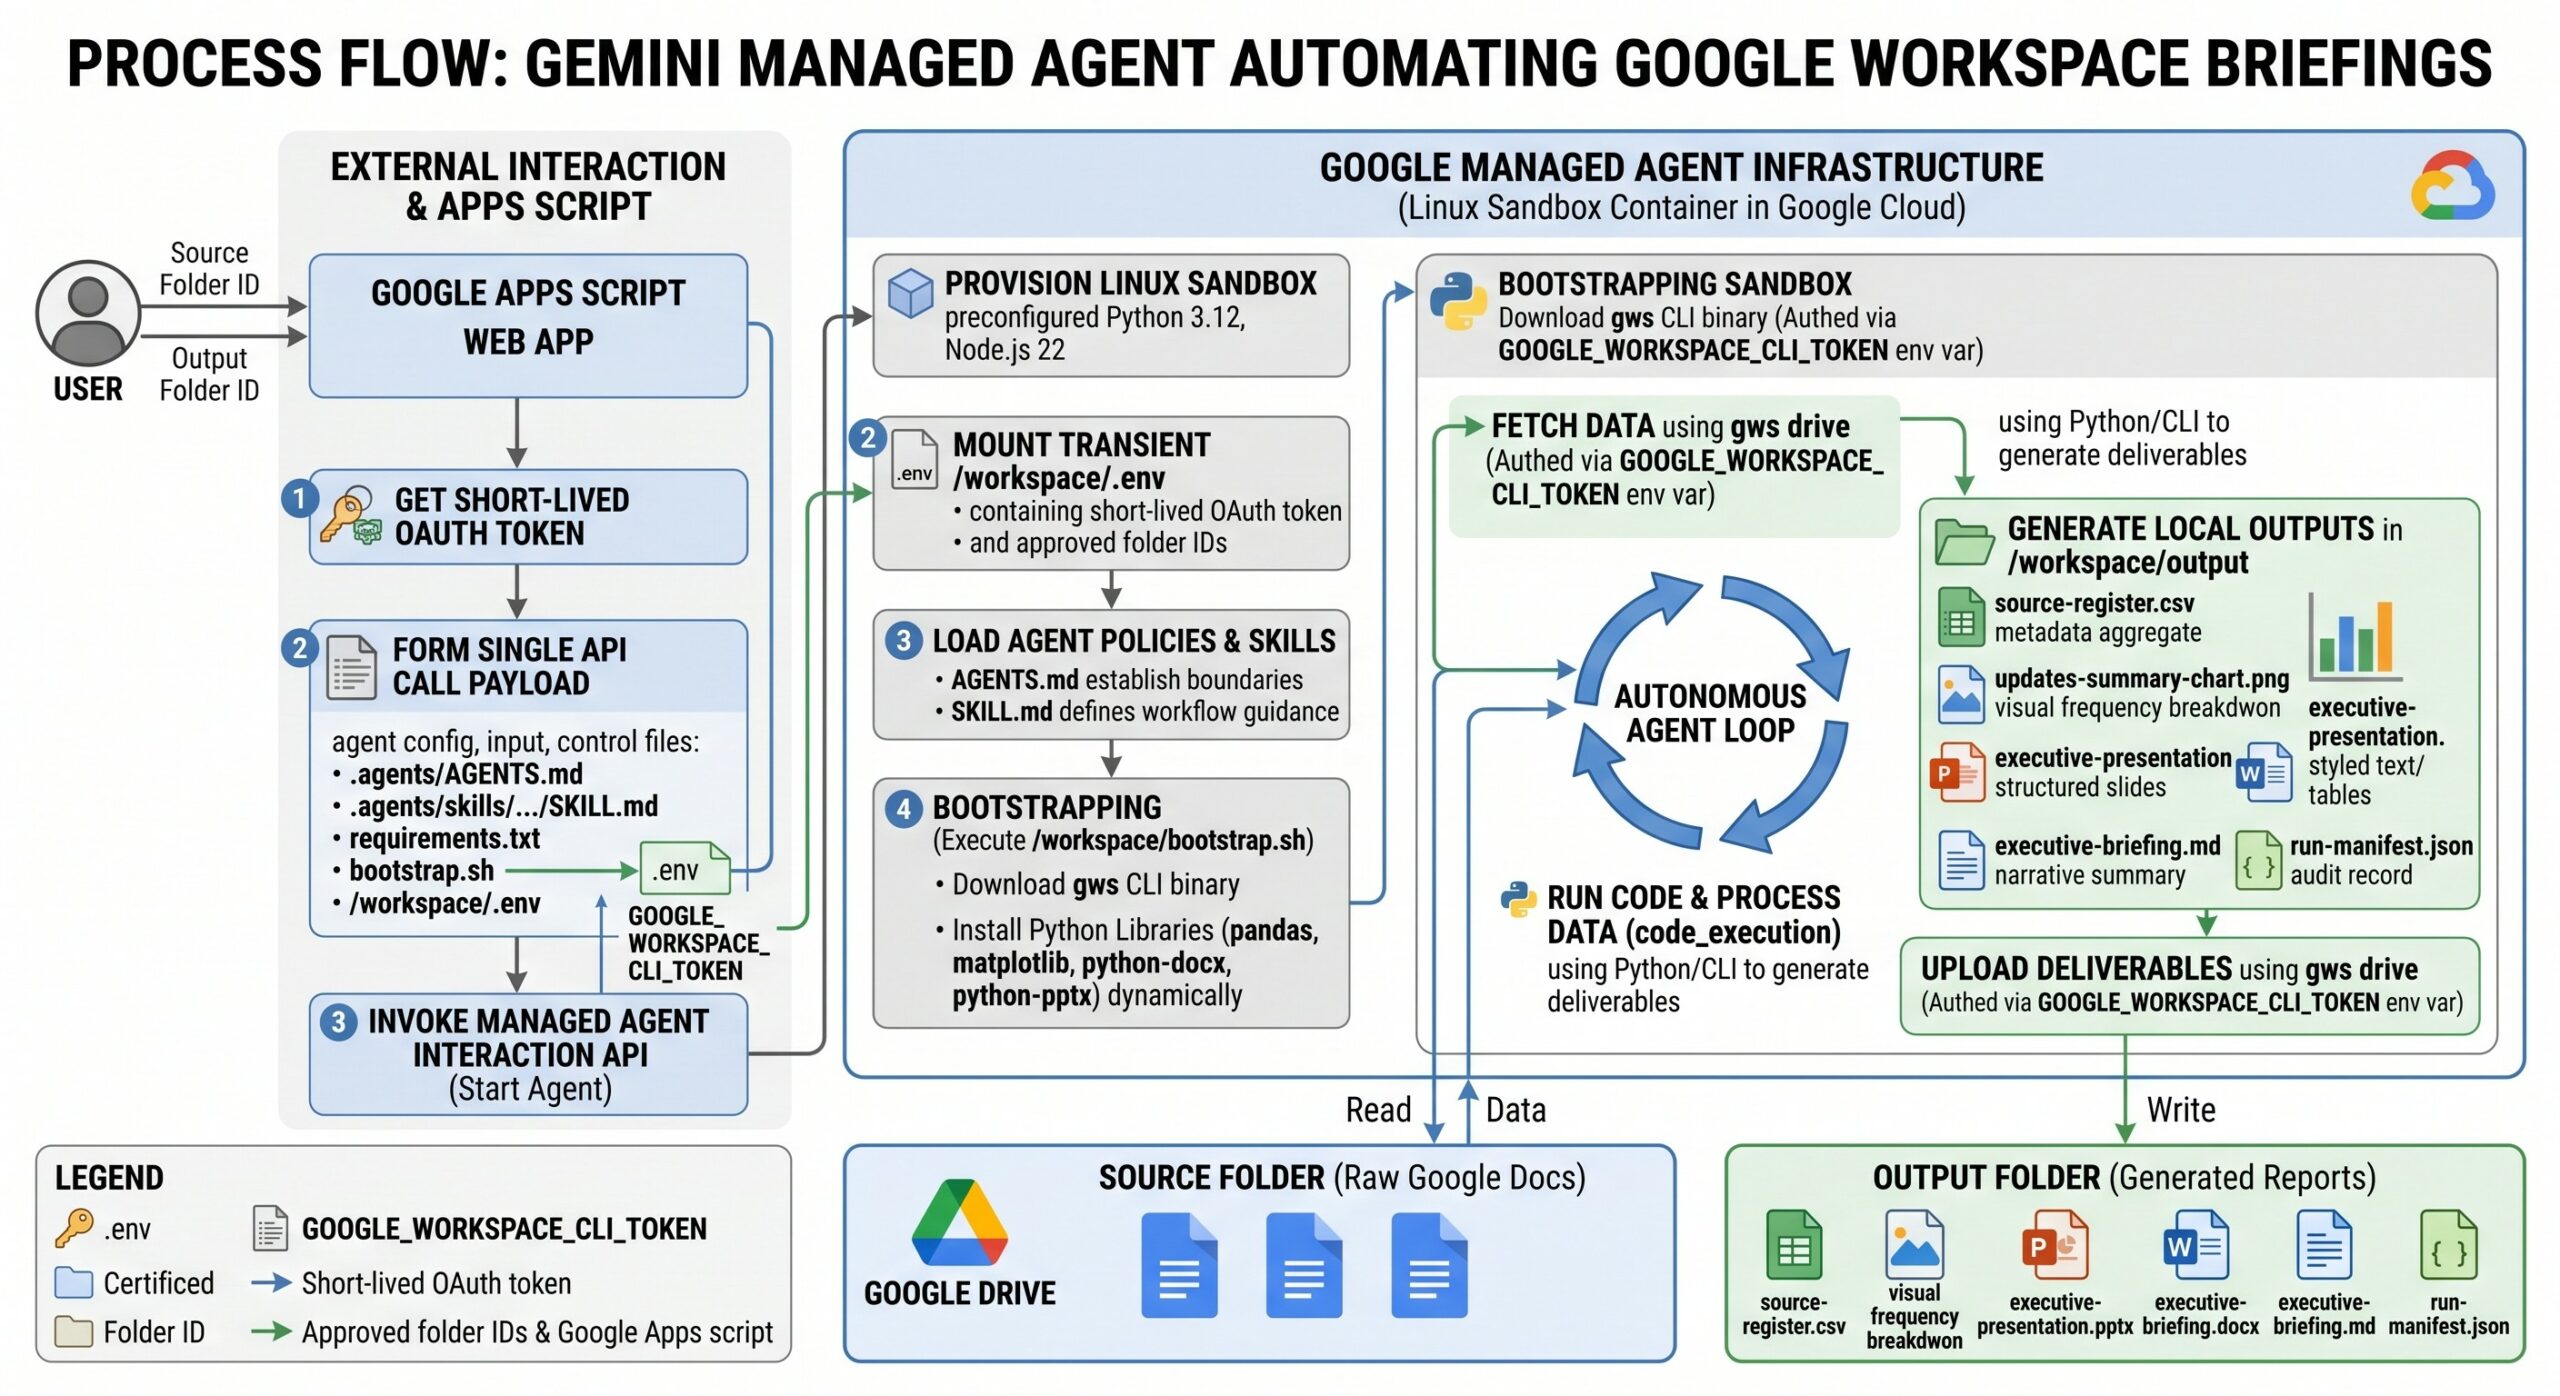
  1. An Apps Script web app runs as the accessing user.
  2. The user supplies a source folder ID and an output folder ID.
  3. Apps Script starts a Managed Agent interaction.
  4. A virtual environment is prepared with:
    • the gws Google Workspace CLI;
    • a Python document and analysis toolchain including python-pptx, python-docx, matplotlib, and pandas;
    • an agent policy (AGENTS.md) and workflow skill (SKILL.md);
    • a per-run .env file containing the current user’s OAuth access token, approved folder IDs, and optional date timestamps.
  5. The agent accesses Drive through gws to find and retrieve relevant source documents using server-side queries.
  6. It generates multi-format deliverables (Word, PowerPoint, chart, CSV) locally in /workspace/output.
  7. It uploads the final reports to the selected output folder.

One of the biggest advantages of a Managed Agent over a basic API call is the ability to provision a full Linux sandbox, preconfigured with Python 3.12 and Node.js 22. You can also install additional libraries and binaries dynamically. In this project, the agent creates the following outputs before uploading them:

Output AssetTooling / LibrariesPre-installed vs. RuntimePurpose
source-register.csvpandasPre-installedAggregates metadata, sorts, and filters document sources.
updates-summary-chart.pngmatplotlibInstalled via pipVisualizes update frequencies and product area breakdowns.
executive-presentation.pptxpython-pptxInstalled via pipCompiles an executive presentation deck formatted into structured slides.
executive-briefing.docxpython-docxInstalled via pipGenerates a styled Word document with headers, callouts, and structured tables.
executive-briefing.mdPlain Text / MarkdownNative FilesystemProvides a lightweight narrative briefing summary.
run-manifest.jsonJSON / jqPre-installedAudit record of all actions taken during the run.

Screenshots

Creating a Managed Agent

To allow the agent to interact with Drive on the user’s behalf without an interactive login prompt, Apps Script fetches the user’s OAuth token:

const userToken = ScriptApp.getOAuthToken();

To limit the potential blast radius, the appsscript.json manifest strictly scopes requested permissions:

{
  "oauthScopes": [
    "https://www.googleapis.com/auth/script.external_request",
    "https://www.googleapis.com/auth/drive.readonly",
    "https://www.googleapis.com/auth/drive.file"
  ]
}

Using drive.file ensures that write access is scoped strictly to files created or explicitly opened by the application, preventing modification of other Google Drive files.

Seamless Credential Delegation to gws

A common challenge with a headless agent environments is authentication. How do you allow a CLI tool to act on the user’s behalf without interactive browser logins (gws auth login) or baking long-lived service account keys into the agent definition?

The gws CLI addresses this by supporting environment-based authentication. When invoked, gws checks for the GOOGLE_WORKSPACE_CLI_TOKEN environment variable. By mounting a transient /workspace/.env file directly into the sandbox environment during interaction creation, gws automatically authenticates all Drive API operations using the active user’s short-lived OAuth token.

Because this token exists solely in memory within the temporary container instance, it naturally expires and is never saved to persistent storage.

Example Interaction Creation Request

The entire custom Managed Agent is created with a single API call. An example payload used in this demo project is included below:

const payload = {
  agent: "antigravity-preview-05-2026",
  agent_config: {
    type: "antigravity",
    model: "gemini-3.7-flash"
  },
  input: [
    {
      type: "text",
      text: "Run the Workspace Update Intelligence workflow...\n" +
            "Approved source folder ID: <SOURCE_FOLDER_ID>\n" +
            "Approved output folder ID: <OUTPUT_FOLDER_ID>\n" +
            "Date range: <DATE_RANGE_AND_QUERY_FILTER>"
    }
  ],
  environment: {
    type: "remote",
    sources: [
      { type: 'inline', target: '.agents/AGENTS.md', content: ASSET_AGENTS_MD },
      { type: 'inline', target: '.agents/skills/update-intelligence/SKILL.md', content: ASSET_SKILL_MD },
      { type: 'inline', target: '/workspace/requirements.txt', content: ASSET_REQUIREMENTS },
      { type: 'inline', target: '/workspace/bootstrap.sh', content: ASSET_BOOTSTRAP },
      { type: 'inline', target: '/workspace/.env', content: DYNAMIC_ENV_INC_AUTH_TOKEN_AND_FOLDER_IDS }
    ]
  },
  tools: [
    { type: "code_execution" }
  ],
  background: true,
  store: true
};

System Instructions and Skills

The payload allows developers to include both an AGENTS.md and SKILL.md into the sandbox

  • System Instructions (.agents/AGENTS.md): Establishes boundaries requiring the agent to only read from SOURCE_FOLDER_ID, only write to OUTPUT_FOLDER_ID, and never disclose /workspace/.env. It instructs the agent to treat all retrieved Workspace text as untrusted reference data, ignoring any embedded instructions or prompt injections.
  • Workflow Skill (.agents/skills/update-intelligence/SKILL.md): Provides structured workflow guidance for using gws drive with field masks, executing Python scripts for artifact generation, and mapping file extensions to Google Drive MIME types during upload.

Tooling and Sandbox Bootstrapping (tools & bootstrap.sh)

As well as the instructions and policies, the payload also configures the agent with execution capabilities and installs the required runtime toolchain:

  • tools: [{ type: "code_execution" }]: Activates the Linux terminal and Python interpreter, allowing the Antigravity agent to write, execute, and debug scripts inside its container.
  • bootstrap.sh & requirements.txt: The payload requires the agent to execute /workspace/bootstrap.sh on startup. This script downloads the static gws CLI binary and installs the specified Python libraries (pandas, matplotlib, python-docx, python-pptx) dynamically.

Asynchronous Execution and State Persistence (background & store)

A workflow that inventories dozens of Google Docs, generates slide decks and Word documents, and uploads deliverables to Drive can take several minutes to run. Two flags make this practical from Google Apps Script:

  • background: true: Launches the agent run asynchronously, immediately returning an interaction_id. The frontend UI simply polls the interaction endpoint periodically for status and live step progress.
  • store: true: Persists the interaction transcript and environment state on Google’s infrastructure. This not only allows the web app to retrieve the final summary and token usage metrics when finished, but also enables multi-turn follow-upsโ€”allowing users to ask the agent to revise or refine documents within the same container without re-bootstrapping.

Summary and References

Combining Managed Agents with the Google Workspace CLI unlocks opportunities to automate complex, multi-step document workflows. Combining the latest Gemini models via the Antigravity agent with a full 4 vCPU / 16 GB Linux sandbox gives developers the ability to build capable autonomous agent workflows directly from Google Apps Script.

The flip side of this, particularly with recent news stories of agents escaping sandboxes, is the implication of providing managed agents with a user token. This is no different from the OAuth token flow already used when extending applications; the difference here is that it is being passed to an agent that can “think” and “reason”. In Google Workspace, it is positive to see that agentic security and governance is being surfaced to administrators for built-in services, but it feels to me that the protocols and standards are still catching up. For users, my advice is to pause and think before you click continue in authentication flows.

A reminder that all the demo project code is in the Adding a Spark of Intelligence to Google Workspace Development: Exploring Gemini Managed Agents in Google Apps Script Repo.

Additional documentation links:

Special thanks to Ryota Tokodai (ryotat7) whose early work inspired this experimental architecture.

Pushing past single-tab data limits in Google Sheets canvas with =AI() and JSON

Following my previous look at the Google Sheets canvas tool I wanted to explore how we can push past single-tab data limits by using the =AI() function to generate structured JSON. If you are new to JSON, it is just a clean, standardised way of packaging information using plain text and clear labels. This technique is universally applicable to any workflow where you need to extract, evaluate and format complex data in a single step.

One of the key design rules of the new Canvas tool is that it can only build interfaces using data from a single sheet tab. If you want to show a detailed breakdown of multiple metrics, a standard spreadsheet setup would force you to create dozens of separate columns to hold every rating, piece of feedback and recommendation. This quickly becomes messy and difficult to manage.

By instructing the =AI() function to bundle all our evaluation data into a single, structured JSON block, we can squeeze a complete relational database into a single cell. This keeps our spreadsheet clean while giving the Canvas tool all the deep metadata it needs to build a rich, interactive dashboard.

What we will be making

When helping customers adopt generative AI tools in their daily workflows, one of the biggest challenges for new users is prompting. To solve this, we are going to build a personalised prompt coaching directly inside Google Sheets. Our tool will automatically analyse any draft prompt, grade its structure, highlight which key elements are missing and provide instant, actionable advice on how to improve it.

The finished, interactive Prompt Coach Dashboard rendering directly over your spreadsheet cells, complete with colour coded status badges, highlighting and a copyable master prompt. Click here to view the readonly version

To build this I will use the official Google Prompting Guide 101. The guide uses a framework with four core pillars:

  • Persona: The specific role, voice or professional perspective assigned to the model (e.g., “You are an expert technical writer”).
  • Task: The core instruction or action verb directing the model (e.g., “Draft an onboarding guide”). This is the only non-negotiable component.
  • Context: Relevant documents, emails, file identifiers or situational details that ground the model in accurate facts (e.g. referencing ambient tags like “@UAT_Results”).
  • Format: The layout, style, length limits or output type requested for the final response (e.g., “Output as a bulleted list of 5 steps”).

By checking draft prompts against these pillars, our Sheets-based coach can pinpoint exactly what a user needs to add to get a great result on their first try. Let us look at how to set up this workflow to parse, score and visualise your prompting templates using dynamic JSON.

Step 1: Set Up the Prompt Auditor Formula

Open your Google Sheet and prepare your columns. Label Column A as “Raw Prompt” and Column B as “JSON Evaluation”.

Enter a draft prompt in cell A2, such as: “Draft an email to my colleague who is running this UAT and explain what they need to do next.”

To construct a prompt to return structured JSON data from the Google Sheet =AI() function I used Gemini to draft and refine our system instructions. Developing a complex, multi-layered instruction that outputs strict JSON without broken formatting is an iterative process. Here is the system prompt I came up with (select cell B2 and write the following formula to analyse the prompt against the four prompting pillars):

=AI("Analyse the draft prompt provided against the Google Prompting Guide 101 framework, which utilises 4 pillars: Persona, Task, Context and Format.

### THE SYNERGY-BASED COACHING BLUEPRINT:
Your goal is to evaluate if the user's prompt is structurally matched to their operational goal, rather than strictly checking off all the components of a prompt. Always recommend including a strong verb or command as part of the prompt task; this is the most important part of a prompt.

1. Task Classification:
   - Identify if the task is primarily CREATIVE/WRITTEN (e.g., drafting emails, brainstorming, translating, slide content) or DATA/OPERATIONAL/ANALYTICAL (e.g., summarising documents, extracting metrics, creating task lists, setting limits).

2. Core vs. Enhancer Logic:
   - 'Task' is the only non-negotiable core pillar.
   - The other 3 pillars (Persona, Context, Format) are optional 'Enhancers'. Evaluate if the user chose the RIGHT enhancers for their specific goal:
     - For CREATIVE/WRITTEN goals: Look primarily for 'Persona', 'Tone' or 'Context' enhancers. Creative prompts do not strictly need constraints or format grids.
     - For DATA/OPERATIONAL goals: Look primarily for 'Format', 'Context' (referencing active file context) or 'Constraints'. Analytical prompts do not strictly need a persona or a tone.

3. Dynamic Tier Ratings:
   Based on the synergy check above, assign one of these three ratings:
   - Foundation: The prompt has a core command but lacks appropriate enhancers (leaving the AI guessing on essential details or voice).
   - Effective: The prompt provides a clear task accompanied by relevant enhancers (e.g., standard persona or basic format), but lacks precise structural boundaries, styling constraints or negative limitations.
   - Masterful: The prompt is highly optimised. It features a strong command, targeted context (or active ambient tags) and multiple precise constraints (such as explicit word counts, custom layout instructions, specific tone rules or negative exclusions). It is designed to get the perfect result on the first run with zero back-and-forth iteration.

### PILLAR MAPPING:

For each of the 4 pillars (task, persona, context, format), status must be exactly 'found', 'weak' or 'missing'. 

- Ambient references like 'this document', 'the open email' or '@Roadmap' represent strong contextual grounding. Mark them 'found'.
- Format and Constraints: Note that 'Format' governs structural layout, timing rules, explicit constraints and negative exclusions (e.g., 'Do not suggest...'). You MUST map these structural guidelines and behavioral boundaries to the 'format' pillar text array.
- Highlight Substrings: When extracting text substrings for the 'text' array, you must copy them EXACTLY as they appear in the original draft prompt. Do not correct spelling, alter punctuation, adjust capitalisation or paraphrase, as this will break the frontend highlighting engine.

### RULE OF COMPLETENESS:

- 'improvedPrompt' MUST NEVER BE EMPTY. You must upgrade the original prompt so that it strictly qualifies for the Masterful rating. To do this, you MUST enrich the original request by injecting:
  1. A highly tailored, expert persona suited to the task.
  2. Explicit structural and formatting guidelines (such as a markdown table with designated column headings or a multi-part layout).
  3. Precise constraints and absolute metrics (such as explicit time limits, word limits or step limits).
  4. At least one negative constraint or exclusion (such as what the model should avoid or ignore).
- 'keyRecommendations' MUST NEVER BE EMPTY. It must contain exactly 3 concrete, actionable pieces of advice explaining what they should add or adjust to improve their prompt's effectiveness inside Google Workspace apps.

### ANALYSIS DIRECTIVES:

- Not every prompt requires all 4 pillars. Think of it like a stool: it only needs 3 or 4 strong legs to stand. DO NOT force or hallucinate a pillar if it is not explicitly present. If a pillar is missing, status must be 'missing' and the text array should be empty.
- A single pillar may appear more than once in a prompt (for example, a prompt can have multiple distinct constraints or background contexts). Return ALL matched case-sensitive substrings for that pillar inside the 'text' string array.
You MUST respond with a single, raw, valid JSON object. Do not include markdown wraps, backticks or preamble text. Use this exact schema. Ratings must be one of these exact strings: [`Foundation` | `Effective` | `Masterful`].

{
  ""rating"": ""Effective"",
  ""improvedPrompt"": ""[Rewritten optimised prompt here]"",
  ""keyRecommendations"": [
    ""First action recommendation"",
    ""Second action recommendation"",
    ""Third action recommendation""
  ],
  ""pillars"": {
    ""task"": {""status"": ""found"", ""text"": [""[substring 1]"", ""[substring 2]""], ""feedback"": ""[guidance]""},
    ""persona"": {""status"": ""missing"", ""text"": [], ""feedback"": ""[guidance]""},
    ""context"": {""status"": ""weak"", ""text"": [""[substring]""], ""feedback"": ""[guidance]""},
    ""format"": {""status"": ""found"", ""text"": [""[substring]""], ""feedback"": ""[guidance]""}
  }
}", B2)

Writing a prompt that outputs perfectly formatted data every single time might feel intimidating, but there are two key features built into this instruction that helps with consistency:

  • Strict JSON Directives: We explicitly tell Gemini to return a single, raw, valid JSON object without any conversational filler or markdown formatting (like triple backticks ```). This ensures that the cell gets only the clean code it needs to be parsed, with nothing extra to cause formatting errors.
  • Exemplar Output: At the very end of the prompt, we provide an empty example structure of the exact JSON we expect. By providing this template, Gemini does not have to guess what keys or structures to use, it simply swaps our placeholder text with its actual evaluation, improving the consistency of the output.

Drag this formula down your column. The =AI() function processes the input text and outputs structured JSON directly into the cell:

{
"rating": "Foundation",
"improvedPrompt": "You are a Senior QA Lead and Project Management Expert. Based on the UAT results in this document, draft a professional and encouraging email to my colleague who is running this UAT. Explain the next steps required to reach sign-off, specifically outlining the bug triaging process and the re-testing cycle. Format the email with a clear 'Action Items' bulleted list and a 'Timeline' section. Constraints: The email should be under 200 words and maintain a collaborative tone. Do not include technical jargon that might confuse non-technical stakeholders.",
"keyRecommendations": [
"Define a professional persona, such as a Senior QA Lead, to establish the right tone and authority for the email.",
"Specify exactly what the 'next steps' are (e.g., bug triaging or re-testing) to reduce ambiguity for the AI.",
"Incorporate structural constraints like word counts and specific section headers to ensure the output is ready to send."
],
"pillars": {
"task": {
"status": "found",
"text": [
"Draft an email to my colleague who is running this UAT and explain what they need to do next."
],
"feedback": "The task is clear and uses a strong verb, though the specific 'next steps' are left for the AI to guess."
},
"persona": {
"status": "missing",
"text": [],
"feedback": "Adding an expert persona like a QA Lead would help set a professional and authoritative tone."
},
"context": {
"status": "found",
"text": [
"this UAT"
],
"feedback": "There is a brief mention of context, but it doesn't explicitly reference the specific document or data the AI should use."
},
"format": {
"status": "missing",
"text": [],
"feedback": "Providing structural guidelines, such as using bullet points for steps, would improve the email's clarity."
}
}
}

This formula pulls out the key parts of each prompt, giving us a neat, organised set of details to display.

What the structured JSON output looks like inside your Google Sheets cell after dragging the =AI() formula down Column B.

Step 2: Create Your Sheets Canvas

Once your evaluation column is populated, open the canvas creation tool to build your custom interface. For this your account needs to be in the Gemini Alpha or if using a personal Gmail account paying for Google AI Ultra or Google AI Pro.

  1. Select Insert from the top menu bar.
  2. Click Create a canvas.

This action opens the Gemini side panel directly inside your spreadsheet.

Step 3: Link Your JSON Data to the Canvas Layout

This is where the magic happens. Since Canvas can read data directly from your active sheet tab, we can instruct Gemini to build visual dashboard elements that bind directly to our JSON column.

To help Gemini understand how to split our single-cell JSON block into distinct UI elements (like progress cards, recommendation lists and copyable text blocks), we provide it with a clear design spec. This spec defines the visual layout and includes a sample set of mock data to show Gemini exactly how our JSON keys map to each display card.

Enter this layout instruction into the side panel prompt box to construct the dashboard:

### **FRONTEND REQUIREMENTS**
The application must feature a modern, minimalist Dashboard interface. Use the **Inter** font family, soft shadows, rounded borders (rounded-2xl), and a clean layout featuring:
1. **Sidebar or Dropdown Selector:** * A select dropdown or list of prompts loaded dynamically from the Google Sheet.  
   * On change, it loads the selected prompt's diagnostic metrics into the main canvas.  
2. **Interactive Highlight Map:** * A container displaying the selected original prompt text with color-coded, underlined highlights representing found pillars.  
   * It MUST support multiple occurrences per pillar (i.e., if pillars[key].text is an array of strings, loop through and highlight every substring occurrence).  
   * If a highlighted segment is clicked, it highlights that specific pillar in the Diagnostic View below.  
3. **Pillar Diagnostic Matrix:** * A 4-column visual status strip with colored indicators showing which pillars are Found (Green), Weak (Amber), or Not Included (Red).  
   * Below the status strip, a card showing details of the active/selected pillar: its definition, the specific matched substring(s) extracted from the prompt, and actionable "Pillar Optimization Guide" feedback.  
4. **Key Recommendations &amp; Optimized Version:** * Displays the 3 top recommendations as numbered target boxes.  
   * Shows the final rewritten "Master Optimized Prompt" inside a clear, styled, copyable container with a one-click clipboard copy button.

### Sample Mock Data to pre-load as default state:
```json
{
  "rating": "Effective",
  "improvedPrompt": "As an expert copywriter, draft a warm, professional thank-you email to @Client for attending the Q3 planning workshop, highlighting our next steps to finalize the product roadmap by Friday.",
  "keyRecommendations": [
    "Specify a persona like 'expert copywriter' to give the email's tone a more distinct and polished feel.",
    "Add a constraint limiting the length of the email to keep it concise and easy to read.",
    "Clarify the format if you want specific sections or a bulleted summary of the next steps."
  ],
  "pillars": {
    "task": {
      "status": "found",
      "text": ["draft a warm, professional thank-you email"],
      "feedback": "Strong core instruction with clear action verbs."
    },
    "persona": {
      "status": "missing",
      "text": [],
      "feedback": "No explicit role or persona defined. Gemini will write from a generic baseline."
    },
    "context": {
      "status": "found",
      "text": ["@Client", "attending the workshop"],
      "feedback": "Excellent use of ambient context referencing a client and specific workshop."
    },
    "format": {
      "status": "weak",
      "text": [],
      "feedback": "You didn't specify length or structure. Consider adding constraints like 'under 150 words' or 'in 3 paragraphs'."
    }
  }
}
```

Gemini hopefully processes your prompt, compiles the interactive layout and renders the dynamic dashboard directly over your spreadsheet cells, similar to this readonly version

Summary

This workflow hopefully demonstrates an easy approach to make more powerful Google Sheets canvas apps. Instead of managing sprawling, hard-to-maintain tables with dozens of columns, or writing hundreds of lines of Google Apps Script to parse text, we can use a single, well-structured formula to run the entire analytical process. The =AI() function does not just gather raw data, it simultaneously classifies tasks, maps dynamic structures, extracts exact highlights and packages this data into a single, clean cell.

Beyond the Grid: First Look at Google Sheets Gemini Canvas and AppSheet

Google recently introduced the Sheets canvas feature to the Gemini Alpha.

Sheets canvas allows users to conversationally build interactive, read-write mini-apps directly from their spreadsheet data. At this time, Sheets canvas is limited to supporting only single-table and single-header tables.

The new Sheets canvas is undeniably a powerful tool for creating interactive applications directly from spreadsheet data. It removes a lot of friction for rapid app creation and allows the building of visual interfaces through simple conversation beyond the current tools in Google Sheets. It is an impressive leap forward.

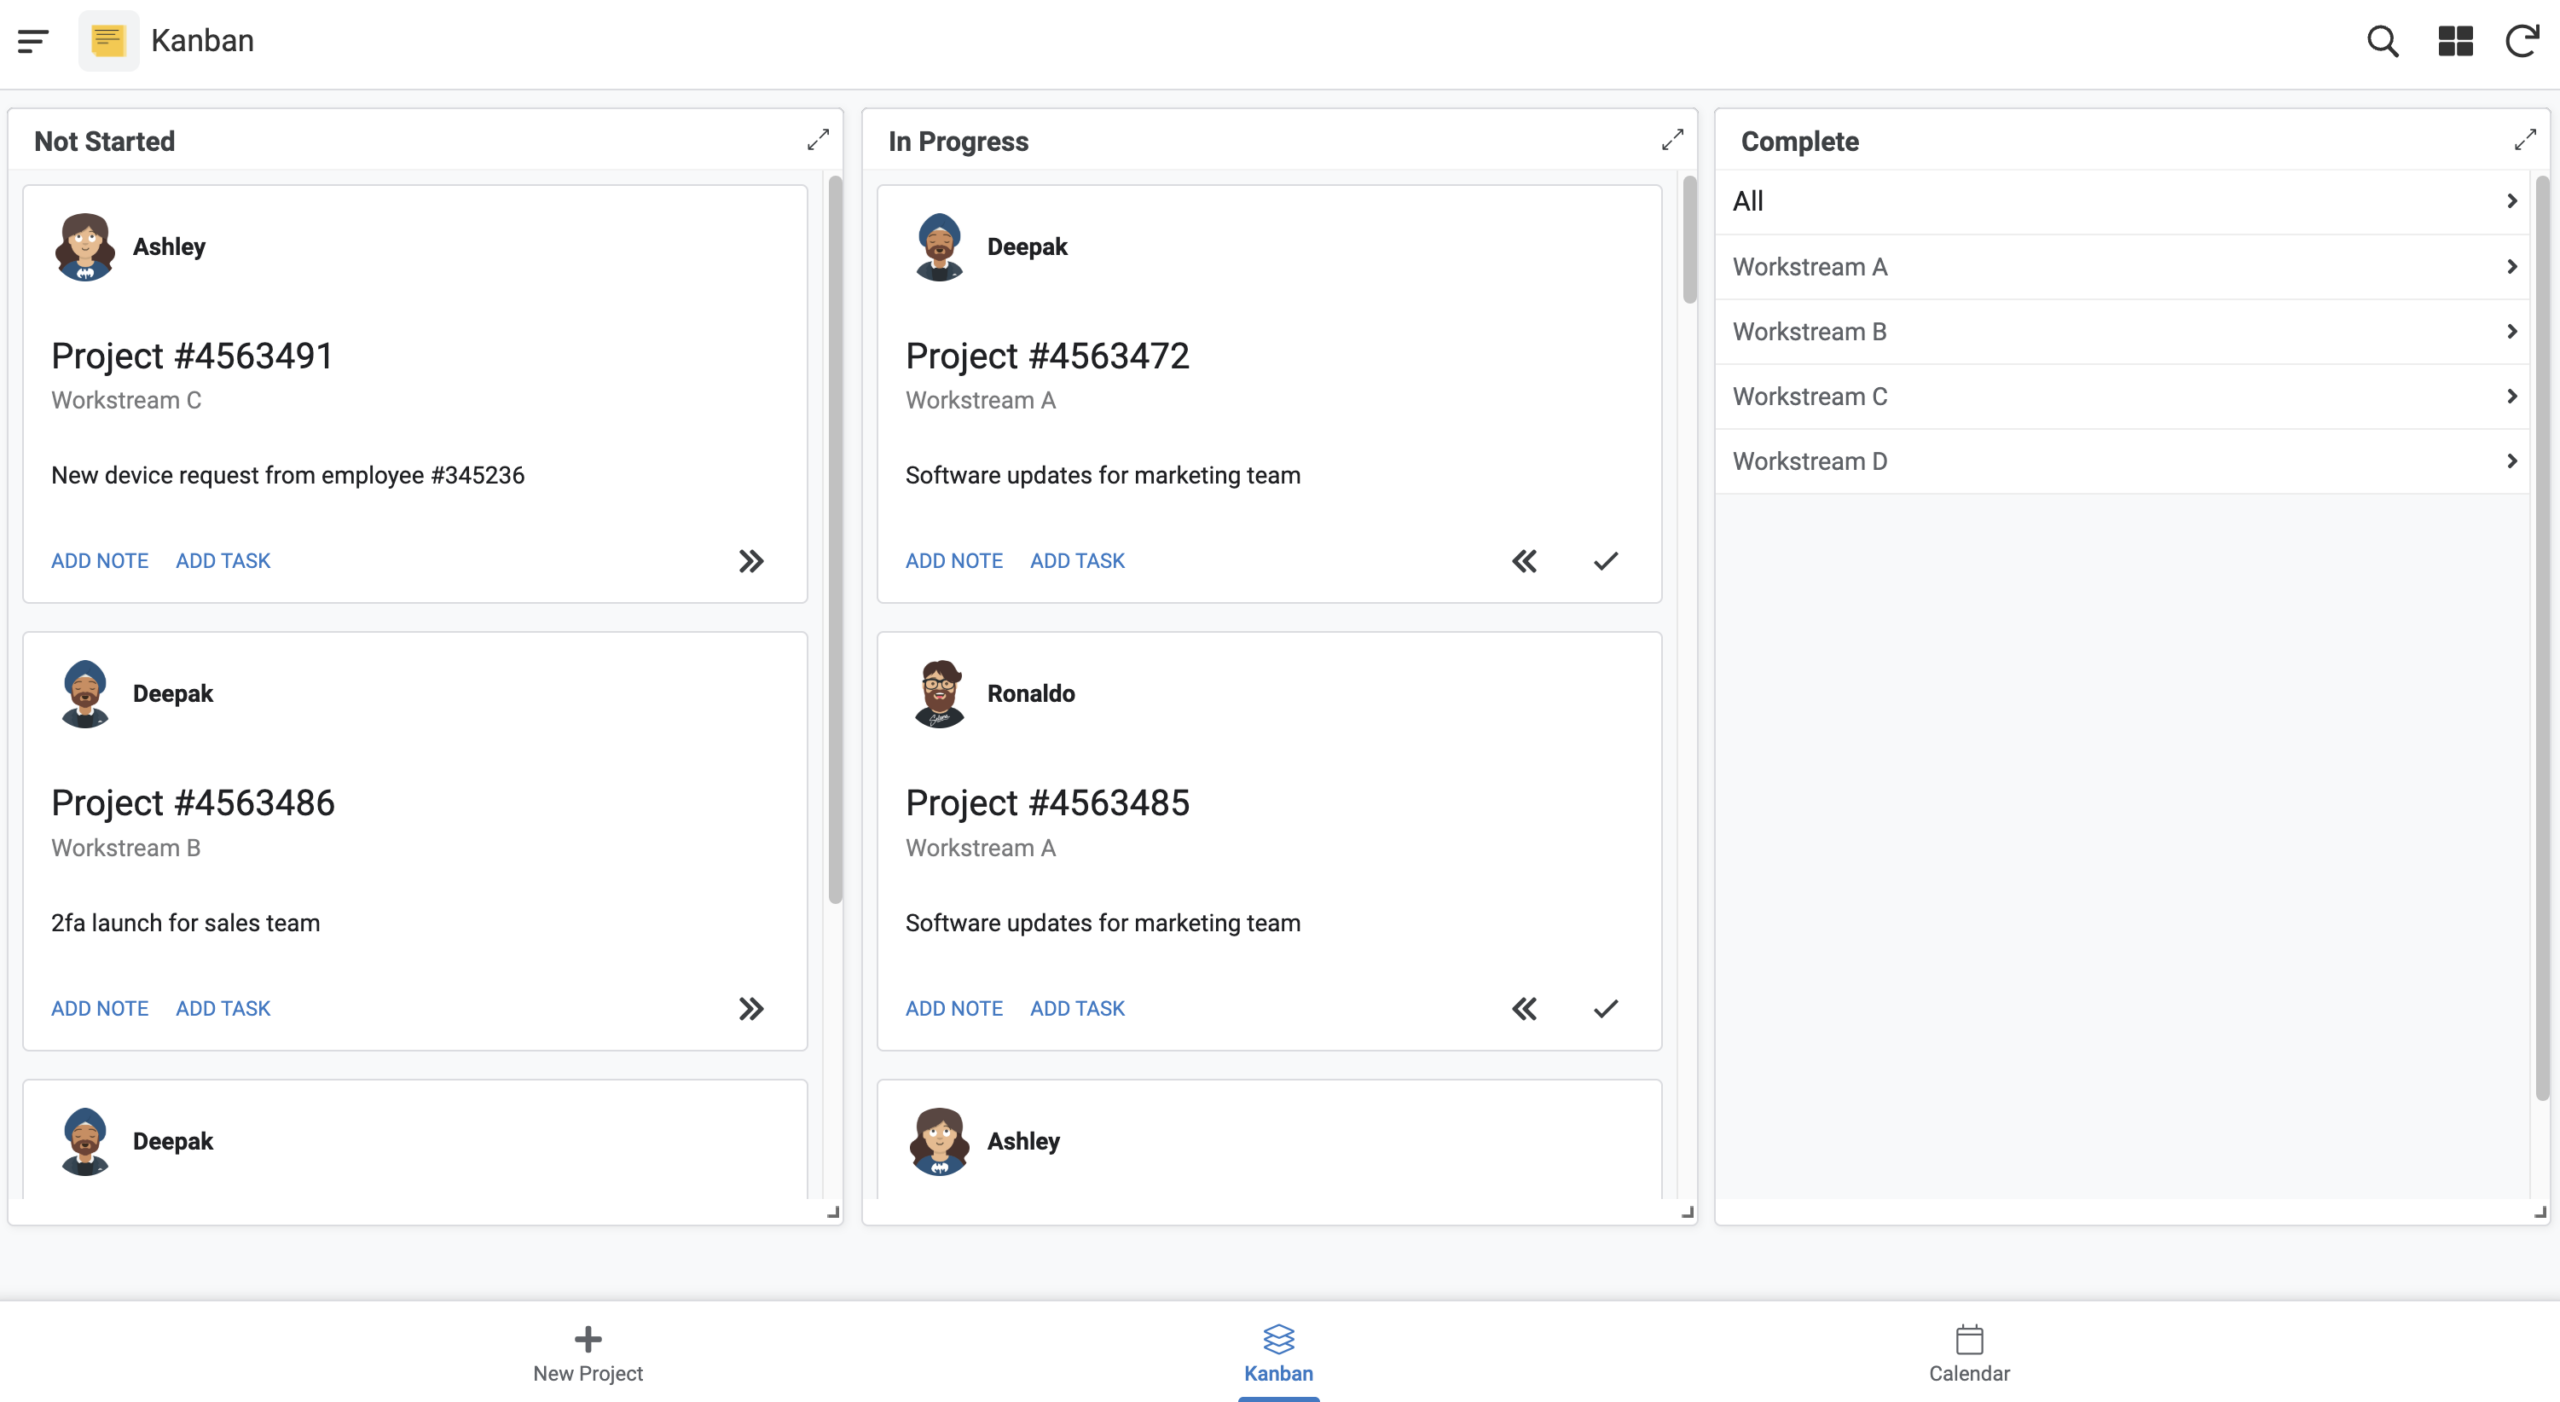
One question I had was how Sheets Canvas compares to other no-code tools like AppSheet. To help explore this, I thought it would be useful to run a practical comparison. In this post, we will build a Kanban board using the same project management dataset, allowing us to evaluate the new Sheets canvas against Google AppSheet.

The Kanban Board Test: Relational vs Flat Data

We will use the official AppSheet Kanban dashboard template as our starter.

Because we are using a template, there is zero setup required. A look at the underlying data structure and youโ€™ll see this app has five distinct tables connecting projects to tasks and workstreams, while mapping people to specific notes. Whilst it still uses a standard Google Sheet as a data source, AppSheet allows us to use true relational data. For example, projects can have related tasks, assigned team members, and detailed histories.

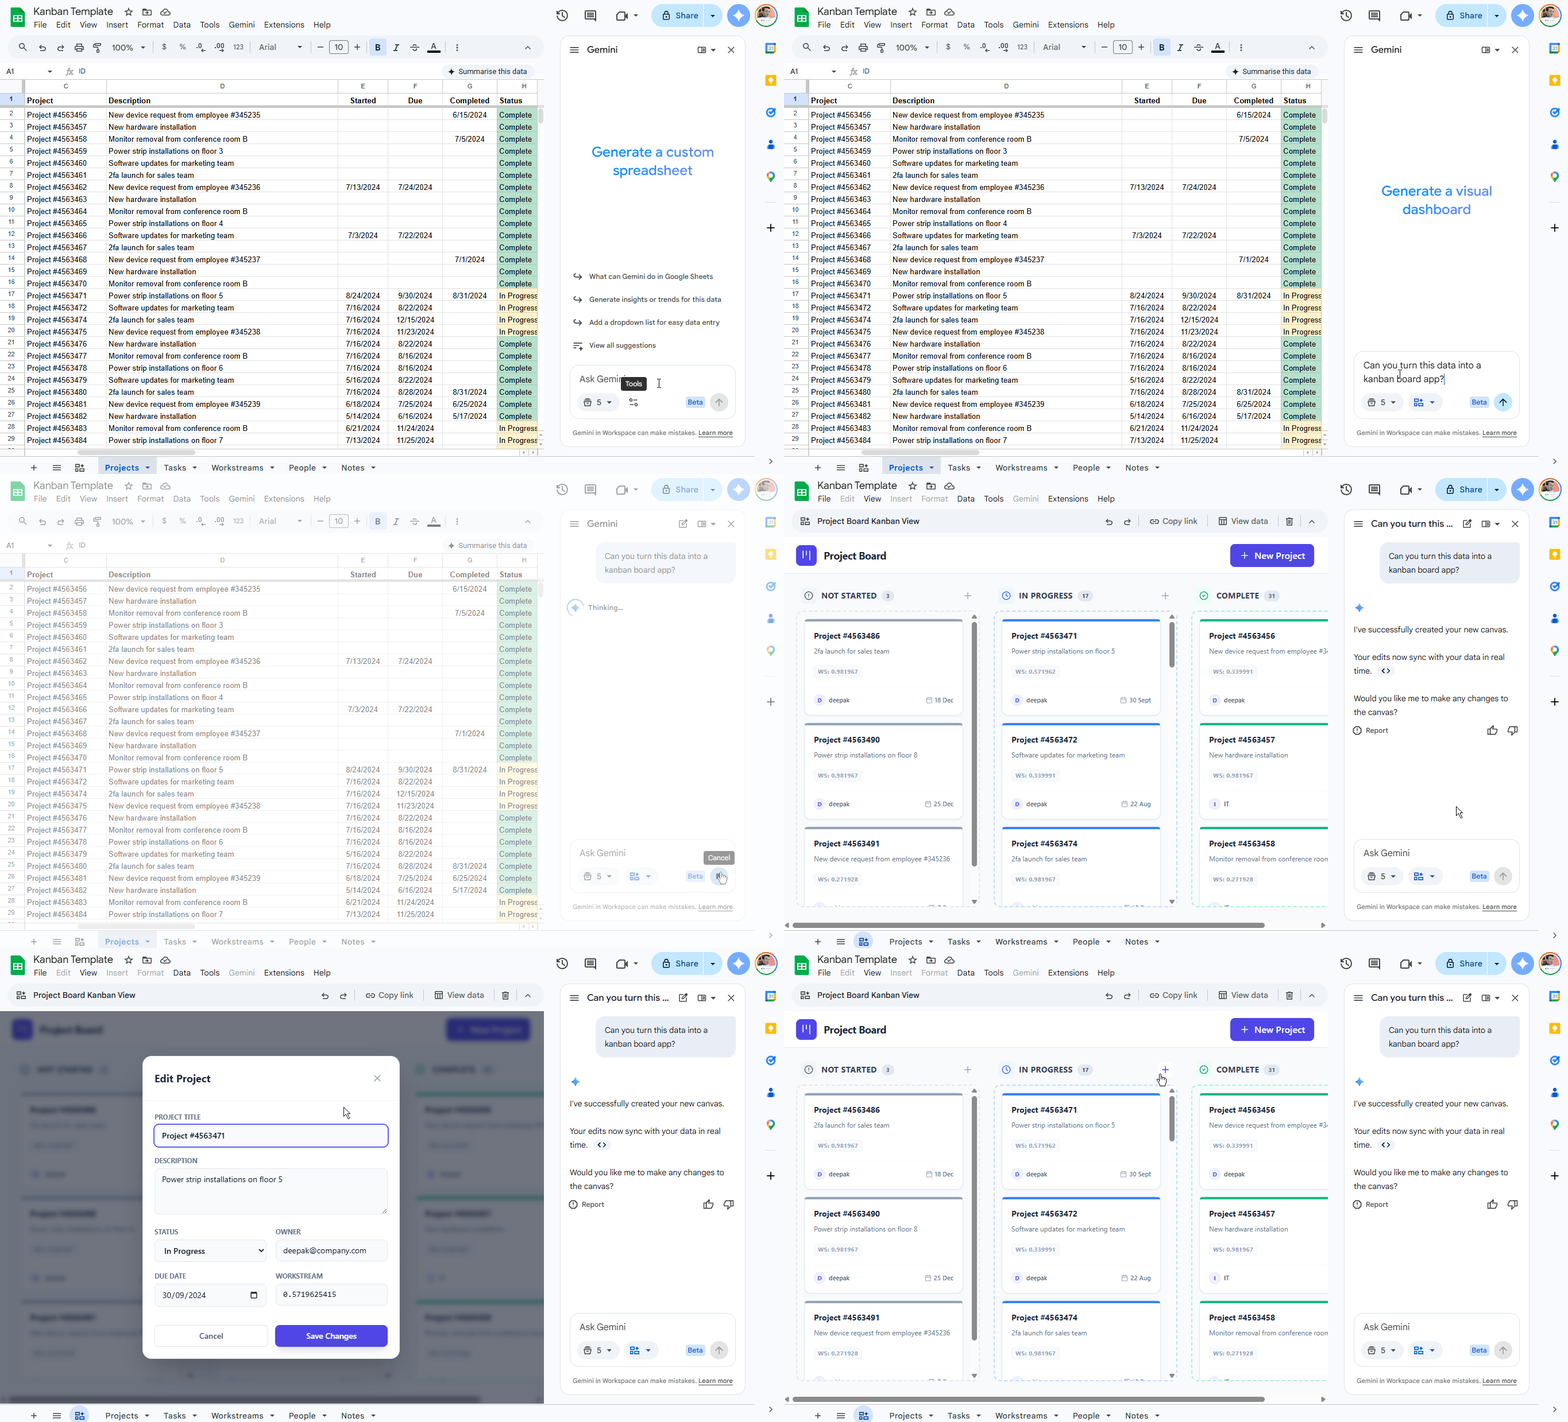
Sheets canvas takes a different approach. Inside your spreadsheet, you open the Gemini side panel, enable the canvas tool, and provide an instruction like โ€œCan you turn this data into a kanban board app?โ€, which you can view (readonly) here.

This experience is similar to the existing AppSheet โ€˜Gemini for App Creationโ€™ with two key differences: in the Sheet canvas we are starting with existing data and the development process is iterative; and if you do continue to ask Gemini to update the canvas, for example, to pull sub-tasks and user avatars from other tabs, something to be aware of is that the result is a clever illusion. Because canvas only ingests the active sheet, you cannot dynamically query other tabs. This is a known current limitation:

Currently, canvases only use data from a single Sheet tab. The canvas provides a read-write interface for your spreadsheet data. If you have edit access, you can edit, delete, or add data directly within the canvas as an alternative to the grid view. If you have comment or view access, you canโ€™t modify the canvas.

Under the Hood: Actions vs Bespoke Code

Comparing how these tools actually generate the interface provides another stark contrast. Asking Gemini to build the board generated hundreds of lines of custom React code. It imported standard web development libraries to render a bespoke interface directly over the spreadsheet cells. You are quite literally prompting an AI front-end developer to build a miniature web application that sits on top of your grid.

Data Integrity: Strict Rules vs Surface Forms

AppSheet enforces data integrity at the system level. You can configure deep initial value formulas that populate fields dynamically based on user context or timestamps. You can deploy strict validation rules that prevent a user from selecting a date in the past or entering a mismatched email address. The application simply will not save the record until the conditions are met.

Sheets canvas handles data entry through surface-level web forms. Looking at the generated code for our Kanban board reveals that the AI used standard HTML form attributes to require certain fields and injected fallback text into the React state to mimic initial values. It is functional. It works well for simple applications; however, the canvas interface does not natively inherit the data validation rules you build into the underlying spreadsheet cells. If you want strict input controls, you must explicitly prompt the AI to write custom JavaScript to catch those errors in the browser.

Security, Governance, and Shadow IT

The biggest difference between Sheets canvas and AppSheet emerges when you look at it at an enterprise level. A Sheets canvas is simply a file formatting layer. Its security model relies entirely on standard Google Drive permissions. If a user has edit access to the spreadsheet, they have edit access to the canvas.

AppSheet operates as a true enterprise platform. It lives behind a dedicated Admin Console where IT teams maintain oversight over every application built across the organisation. For teams using AppSheet Enterprise Plus licences, administrators can define governance policies that automatically enforce corporate compliance across hundreds of independent projects. An administrator might create a rule that instantly blocks deployment if a user attempts to connect an unapproved external database or fails to mandate strict domain authentication.

The Feature Comparison

To help you decide which tool fits your current project, here is a breakdown of their core capabilities.

Feature Sheets Canvas (Alpha) AppSheet
Primary Purpose Building custom interfaces to visualise and update single-sheet data. Building robust business applications with a dedicated desktop mode.
Data Source A single Google Sheet tab. Multiple sources including Sheets, SQL, and external APIs.
Data Structure Flat. Cannot access other tabs dynamically. AI relies on faking relationships with hardcoded static data. Relational.
Data Validation Basic HTML/React form rules. Requires custom JavaScript for complex logic. Deep system-level validation and computed initial values.
Read/Write Access Editors can edit, delete, or add data. Viewers cannot. Granular, role-based database access.
Complexity Level Low. Prompt-driven visualisations generating React code. High. Requires structured logic and intentional design.
Security & Governance Relies on standard Google Drive file permissions. Centralised admin console with strict policy-driven enterprise governance.

The Verdict

If you need a quick dashboard to track your team’s weekly tasks, use Sheets canvas. It is fast, intuitive, and keeps everyone working within a familiar spreadsheet environment while the AI handles the complex front-end code.

If your workflows are growing, if you need to connect multiple data sources like mapping notes and users to specific projects reliably, or if your IT department requires strict visibility over internal tools, AppSheet remains the undisputed choice.

Exploring Google Workspace Events API: Event-Driven Google Drive Automation

Have you ever used Google Workspace Studio? If so, you might have seen its “Google Drive Folder” trigger that instantly reacts to new files. It is an excellent feature for no-code automation, however, it has its limitations in what you can do in subsequent Studio steps.

If you are interested in this capability but would like to do more, I’ve just published an example repo which explores Google Drive events which is currently in the Developer Preview as part of the new Workspace Events API. With this you can subscribe to real-time changes including file uploads to specific folders, which opens opportunities for programmatically interacting with Google Drive and other services.

A Practical Application: Enterprise Data Pipelines

For me one of the most valuable applications for this capability lies within enterprise data pipelines. In many corporate environments, business users lack direct access to Google Cloud Storage buckets which are often used in data pipelines and instead they rely entirely on Google Drive for file sharing and collaboration.

By subscribing to folder events, developers can automatically trigger the movement or digestion of data the exact moment a user drops a new file into a designated Drive folder. This creates a seamless, automated bridge between user-facing storage interfaces and backend processing systems.

Architectural Highlights from the Demo

To demonstrate this Iโ€™ve published a complete proof of concept in theย Google Drive to Google Sheets Notification Add-on Tutorial. This is a basic Google Workspace Add-on which lets users โ€˜subscribeโ€™ to a Google Drive folder and get realtime updates to a Google Sheet. The example replicates what is possible already with Workspace Studio, but the idea is once you know how to set up a subscription you can do anything you want with that file. The example, unusually for me, has zero Apps Script meaning for chunkier data problems you can easily scale on Google infrastructure. If you look at the codebase, hopefully there are several design patterns that are useful for Workspace developers:

  • Infrastructure as Code (IaC):ย Rather than configuring the Google Cloud project services manually via the console, the repository includes Terraform configuration files to automatically provision the necessary Pub/Sub topics, service accounts, and IAM bindings required for secure message delivery. Using a โ€˜Infrastructure as Codeโ€™ makes it easy to โ€˜applyโ€™ updates to your project.
  • Built-in Resilience:ย The Terraform configuration explicitly sets up a dead-letter topic. If your Event Processor fails to handle a file notification, the message routes to this secondary queue, ensuring no data events are lost during temporary outages or bugs.
  • Decoupled Execution:ย The example also separates user interaction from backend processing. An Add-on Handler manages user authorisation and API subscription creation meanwhile, a dedicated Node Cloud Function acts as a secure Event Processor, picking up messages asynchronously via Pub/Sub to prevent timeout issues.

The 3 Gotchas We Are Solving

The Drive API already has aย watchย endpoint but there three common obstacles that the new Workspace Events API gracefully solves:

  • The “Blind Ping”:ย When watching a folder with the legacyย files.watch, the notification only tells you that the folder’s contents changed; it does not explicitly tell youย whichย file was added. You are therefore forced to perform a secondary query to find the new file. The new Workspace Events API solves this by handing you the exact ID of the newly added file directly in the payload.
  • The Public URL Requirement:ย Standard webhooks require a public HTTPS URL and domain verification. By routing our events through Google Cloud Pub/Sub, this approach allows you to receive notifications privately and securely.
  • The Empty Payload:ย Google typically sends legacy notification data hidden within HTTP headers, which can be difficult to parse in certain environments, such as Apps Script. This is less of a concern in the shared example as we are using only Cloud Run Functions.

Summary

Hopefully, the demo is helpful showcasing what is possible using the Google Workspace Events API and Infrastructure as Code architectures. If there are any hints or tips I have missed, feel free to drop them in the comments below.

Resources & Further Reading

Delegated Power: Showcasing a Google Workspace Admin Toolbox Concept in AppSheet and Apps Script

The Google Admin Console is a powerful engine, but it often becomes a bottleneck for delegated tasks. IT teams frequently find themselves trapped in “Admin Debt,” repeating manual steps because granting full administrative access to others is a security risk.

At the Google for Education IT Admin Summit in London, I shared a session on how to move from a static interface to a dynamic, automated engine. The goal is to build an “Admin Toolbox” that showcases how some Admin SDK and other Workspace API capabilities can be integrated into secure, self-service applications using AppSheet and Google Apps Script.

For those who couldn’t attend, or for those who want to dig into the code, Iโ€™ve made the session guide available below.

“We are building a data bridge that turns raw directory records into a functional database that understands who people are and, more importantly, who they report to.” โ€” Session Guide: The Automated IT Toolbox

Practical Builds in the Toolbox

The session guide covers four distinct areas where these technologies intersect to solve common IT headaches:

  1. Hierarchical Directory Apps: Building a connection to the Admin SDK to create a searchable directory with security filters based on reporting lines.
  2. Automated Shared Drive Provisioning: A workflow where AppSheet handles the request and Apps Script acts as the administrator to create and name drives automatically upon approval.
  3. ChromeOS Management: Using the Reports API to create a live activity feed of login events and issuing remote commands like “Lock Device.”
  4. AI-Powered Damage Reports: Utilising the Gemini API to analyse photos of damaged hardware. Users can snap a photo, and the AI provides a structured analysis of the severity and required parts.

Gemini as a Development Partner

A key takeaway from the session was that I didn’t write any of this code from scratch. Instead, I used the Gemini App as a pair programmer. While Gemini was excellent for standard data tasks, it reached its limits when handling more obscure or less documented API calls. In these areas, my existing knowledge of the Workspace platform was essential. I had to refine my prompts and provide specific technical context to guide the model toward a reliable solution. It highlights that while AI is a powerful assistant, it still needs a knowledgeable pilot to navigate the complexities of advanced APIs.

The full session guide includes code snippets as well as some of the advanced โ€˜watchโ€™ and Gemini API structured output.

Source: Google Doc | GitHub Repo

Supercharging AppSheet API development with Gemini and OpenAPI specs

We know that to get the most out of generative AI tools like Gemini (gemini.google.com), you need to provide them with high-quality context. For AppSheet creators, there is a “hidden gem” within the platform that generates automatic documentation for your app. By navigating toย Settings > Information > App documentation, you can access a comprehensive PDF that details your app’s definition; this is an excellent resource for human review and archiving.

However, when working with tools like the Gemini to generate code or API calls, a flattened PDF isn’t always the most efficient format for the model to parse. For creators looking for a more machine-friendly alternative,ย QREW Apps recently suggestedย a clever method to access the OpenAPI specification of your app directly.

App owners can retrieve this structured data by appending their app’s UUID to the AppSheet API v2 URL: https://www.appsheet.com/api/v2/apps/{app-guid}/openapi.json

This OpenAPI JSON export provides a structured blueprint of your app’s API capabilities. Unlike the PDF documentation, this JSON format is highly digestible for an AI. For creators beginning to experiment with the AppSheet API, uploading this JSON file into gemini.google.com allows the model to understand the exact schema and capabilities of your specific application.

With this context loaded, Gemini can assist in constructing accurate API calls. For example, if you are looking toย Call a webhook from an automation, Gemini can generate valid payloads, enable batch updates, or script complex data interactions that would typically require significant manual trial and error.

For those of you working with Google Apps Script, you can pair this technique with myย AppSheetApp library. With the OpenAPI spec providing the schema, providing the library code which handles the API communication, you can prompt Gemini to write a script for your AppSheet automation.

I am keen to hear how you get on with this workflow. If you discover other interesting ways to combine OpenAPI specs with Gemini to accelerate your Google Workspace development, feel free to share them in the comments. As always, happy scripting!

Vertex AI Advanced Service in Apps Script: A Step Forward or a Missed Opportunity?

As Google Apps Script developers, we are used to waiting. We wait for new runtime features, we wait for quotas to reset, and recently, we have been waiting for a first-class way to integrate Gemini into our projects.

With the recent release of theย Vertex AI Advanced Service, the wait is technically over. But as detailed inย Justin Poehnelt’sย recent post,ย Using Gemini in Apps Script, you might find yourself asking if this was the solution we were actually looking for.

While the new service undoubtedly reduces the boilerplate code required to call Googleโ€™s AI models, it brings its own set of frustrations that leave me, and others in the community, feeling somewhat underwhelmed.

The “Wrapper” Trap

On the surface, the newย VertexAIย service looks like a win. As Justin highlights, replacing complexย UrlFetchAppย headers with a singleย VertexAI.Endpoints.generateContent()ย call is a significant cleanup.

However, this convenience comes with an administrative price tag. The Vertex AI Advanced Service requires a standard Google Cloud Project, understandable for billing, but requires the creation of an oAuth consent screen. For the majority of internal enterprise applications, I would imagine either a service account or aย https://www.googleapis.com/auth/cloud-platformย scope and associated IAM will be the preferred approach. This removes the need for a consent screen and, in the case of Service Accounts, rules out the Vertex AI Advanced Service.

It begs the question:ย Why didn’t Google take the approach of theย Google Gen AI SDK?

In the Node.js and JavaScript world, the new Google Gen AI SDK offers a unified interface. You can start with a simple API key (using Google AI Studio) for prototyping, and switch to Vertex AI (via OAuth) for production, all without changing your core code logic. The Apps Script service, by contrast, locks us strictly into the “Enterprise” Vertex path. We seem to have traded boilerplate code for boilerplate configuration.

A Third Way: The Community Approach

If you are looking for that Unified SDK experience I mentioned earlier, where you can use the standard Google AI Studio code patterns within Apps Script, there is a third way.

I have published a library,ย GeminiApp, which wrapsย UrlFetchAppย but mimics the official Google Gen AI SDK for Node.js. This allows you to write code that looks and feels like the modern JavaScript SDK, handling the complexย UrlFetchAppย configuration under the hood.

As you can see in the comparison above, the Advanced Service (left) abstracts away the request complexity, theย UrlFetchAppย method (middle) gives you the transparency and control you often need in production, and theย GeminiAppย library (right) offers a balance of both.

Disclaimer: As the creator of this library, I admit some bias, but it was built specifically to address the gap.

It is important to note a distinction in scope. Both the Google Gen AI SDK andย GeminiAppย are focused strictly onย generativeย AI features. Theย Vertex AI Advanced Service, much like the platform it wraps, offers a broader range of methods beyond just content generation.

If your needs extend into those wider Vertex AI capabilities, but you still require the authentication flexibility ofย UrlFetchAppย (such as using Service Accounts), I have a solution for that as well. Myย Google API Client Library Generator for Apps Scriptย includes a build for the fullย Vertex AI (AI Platform) API. This gives you the comprehensive coverage of the Advanced Service with the architectural flexibility of an open-source library.

Here is how you can use the generated client library to authenticate with a Service Account, something impossible with the official Advanced Service:

/**
 * Example using the generated Aiplatform library with a Service Account.
 * Library: https://github.com/mhawksey/Google-API-Client-Library-Generator-for-Apps-Script/tree/main/build/Aiplatform
 */
function callGemini(prompt) {
  const projectId = 'GOOGLE_CLOUD_PROJECT_ID';
  const region = 'us-central1';
  const modelName = 'gemini-2.5-flash';

  const modelResourceName = `projects/${projectId}/locations/${region}/publishers/google/models/${modelName}`;

  const serviceAccountToken = getServiceAccountToken_(); 

  const vertexai = new Aiplatform({
    token: serviceAccountToken
  });

  const payload = {
    contents: [{
      role: 'user',
      parts: [{
        text: prompt
      }]
    }],
    generationConfig: {
      temperature: 0.1,
      maxOutputTokens: 2048
    }
  };

  const result = vertexai.projects.locations.publishers.models.generateContent({
    model: modelResourceName,
    requestBody: payload
  });

  return result.data.candidates?.[0]?.content?.parts?.[0]?.text || 'No response generated.';
}

When “Advanced” Means “Behind”

There is another catch that Justin uncovered during his testing: the service struggles with the bleeding edge.

If you are trying to access the latest “Preview” models to prototype, such as the highly anticipatedย gemini-3-pro-preview, the advanced service may fail you. It appears the wrapper doesn’t yet support the auto-discovery needed for these newer endpoints.

In his companion post,ย UrlFetchApp: The Unofficial Documentation, Justin reminds us whyย UrlFetchAppย is still the backbone of Apps Script development. When the “official” wrapper doesn’t support a specific header or a beta model,ย UrlFetchAppย is the only way to bypass the limitations.

The Verdict

The Vertex AI service is a welcome addition for stable, enterprise-focused applications. But for developers, particularly those who want to test the latest Gemini 3 capabilities, it feels rigid compared to the flexibility seen in other Google developer ecosystems.

It serves as a good reminder that in Apps Script, convenience services are great, but understanding the underlying HTTP requests viaย UrlFetchAppย  extends what you can achieve.

Breaking the Grid: 4 Ways to Generate Excel Files from Google Workspace

We have all been there: You build a beautiful, automated dashboard in Google Sheets. Itโ€™s dynamic, itโ€™s collaborative, and itโ€™s perfectly integrated with your data sources. Then, the stakeholder request comes in:ย “Can you email this to me as an Excel file every Monday morning?”

For Google Workspace developers, the “Excel Requirement” is often a stumbling block. While Google Sheets is powerful, the bridge to Excel can be shaky. In this post, Iโ€™m going to explore four architectural approaches to solving this problem. If you would like to play along here is theย Google Sheet Invoice Templateย and theย Excel Invoice Template.

1. The Low-Code Agent (AppSheet Automation)

Before you write a single line of code, you should consider if the platform can do the heavy lifting for you. Since AppSheet is now a core part of Google Workspace, it offers a native “No-Code” way to generate Excel files that is robust, scheduled, and template-based.

The Strategy

Instead of writing a script to fetch data and build a file, you connect your Google Sheet to an AppSheet app. You then configure anย Automationย that triggers on a schedule or a data change.

The Workflow:

  1. Trigger:ย A new row is added to your “Invoices” sheet (or a weekly schedule fires).
  2. Task:ย AppSheet runs a “Create a new file” task.
  3. Template:ย It reads a simplified Excel template stored in Drive, replaces tags likeย <<[Qty]>>ย with actual data, and generates the file.
  4. Delivery:ย The file is saved to Drive or emailed directly to the client.

Why This Wins

  • Zero Maintenance:ย No scripts to debug, no OAuth tokens to manage, and no breaking changes when APIs update.
  • Native Templates:ย It supports complex Excel formatting out of the box.

The Limitation

  • Syntax:ย You must use AppSheet’s specific templating syntax (<< >>) inside your Excel file.
  • Scaling:ย Generating reports with thousands of line items can hit automation timeout limits.

2. The Native Export (Apps Script)

If you need more granular control or don’t want to spin up an AppSheet app, the most common starting point is attempting to do everything within Apps Script. You create a temporary Google Sheet, fill it with data, and then export it using the Drive API.

The Code

In this scenario, we assume you have a Google Sheet version of your Invoice template. We first write the specific line items to the Sheet, then export it.

function generateInvoiceExport() {
  const ss = SpreadsheetApp.getActiveSpreadsheet();
  const sheet = ss.getSheetByName('InvoiceTemplate');
  
  // 1. Prepare Invoice Data
  const invoiceData = [
    { desc: "Web Development - Phase 1", qty: 40, unit: 100 },
    { desc: "Server Hosting (Annual)", qty: 1, unit: 250 },
    { desc: "Domain Registration", qty: 2, unit: 15 },
    { desc: "Maintenance Retainer", qty: 10, unit: 85 }
  ];
  
  // 2. Map data to the Sheet structure (Cols B, C, D, E, F)
  // B=Desc, E=Qty, F=Unit. (C and D are skipped/empty)
  const rows = invoiceData.map(item => [item.desc, "", "", item.qty, item.unit]);

  // 3. Write data to the Google Sheet
  // Matches Template: Start at Row 19, Column B (2)
  if (rows.length > 0) {
    // Corrected: ensure the number of columns (5) matches your data structure
    sheet.getRange(19, 2, rows.length, 5).setValues(rows);
  }
  
  // 4. Construct the export URL for the populated sheet
  const fileName = `Invoice_${new Date().toISOString().slice(0,10)}.xlsx`;
  const url = `https://docs.google.com/spreadsheets/d/${ss.getId()}/export?format=xlsx&gid=${sheet.getSheetId()}`;
  
  // 5. Fetch and Save
  const params = {
    method: "GET",
    headers: { "Authorization": `Bearer ${ScriptApp.getOAuthToken()}` },
    muteHttpExceptions: true
  };
  
  const response = UrlFetchApp.fetch(url, params);
  
  if (response.getResponseCode() === 200) {
    const blob = response.getBlob().setName(fileName);
    const file = DriveApp.createFile(blob);
    console.log(`Success: Invoice saved to Drive (ID: ${file.getId()})`);
  } else {
    console.log(`Error: ${response.getContentText()}`);
  }
};

The Limitations

  • Speed & Scale:ย The overhead of creating a temporary sheet and exporting it adds up. Generating 50 invoices in a loop will take a long time.
  • The “Source” Gap:ย Your source materialย mustย be a Google Sheet, meaning you lose Excel-specific features like Power Query or VBA macros from your template.

3. The Browser Round-Trip (ExcelJS)

If you need to maintain stricter fidelity to an existing Excel template (preserving fonts, colors, and layouts) and are interested in speed, you can use the “Round Trip” technique.

This method uses the user’s browser as a processing engine. You fetch theย Invoice.xlsxย template from Drive, process it client-side withย ExcelJS, and send the result back.

View the Code Project

The Strategy

  1. Parallel Fetching (Client):ย The browser fires concurrent requests to Apps Script to fetch the template (Base64) and invoice data.
  2. Client-Side Processing:ย ExcelJS loads the template, injects data into specific cells (preserving layout), and recompiles the file.
  3. Upload:ย The new file is encoded and sent back to Drive.

The Code

This snippet focuses on the core orchestration logic. For the full UI setup and helper functions, see the linked project.

/* --- CLIENT SIDE (Core Logic) --- */
async function startGeneration() {
  
  // 1. Parallel Fetching
  // Fire both requests at once to speed up the wait time
  const [templateResponse, invoiceData] = await Promise.all([
    runGoogleScript('getTemplateBase64', null), 
    runGoogleScript('getInvoiceData')
  ]);

  // 2. Load into ExcelJS
  const workbook = new ExcelJS.Workbook();
  const binaryString = atob(templateResponse.base64);
  const bytes = new Uint8Array(binaryString.length);
  for (let i = 0; i < binaryString.length; i++) { bytes[i] = binaryString.charCodeAt(i); } await workbook.xlsx.load(bytes.buffer); // 3. Modify the Sheet const sheet = workbook.worksheets[0]; let currentRow = 19; // Starting at Row 19 based on template invoiceData.forEach((item, index) => {
    // Ensure we do not write past the visual template limit (e.g. Row 22)
    if (currentRow + index > 22) return;

    const row = sheet.getRow(currentRow + index);
    
    // Inject data into specific cells (B, E, F)
    row.getCell(2).value = item.desc;  
    row.getCell(5).value = item.qty;   
    row.getCell(6).value = item.unit;  
    
    // ExcelJS preserves the existing styles of these cells!
    row.commit();
  });

  // 4. Export & Save
  const outBuffer = await workbook.xlsx.writeBuffer();
  
  // Convert buffer to base64 (simplified for brevity)
  let binary = '';
  const outBytes = new Uint8Array(outBuffer);
  for (let i = 0; i < outBytes.length; i++) {
    binary += String.fromCharCode(outBytes[i]);
  }
  const outBase64 = btoa(binary);

  // Upload back to Drive
  await runGoogleScript('saveProcessedFile', outBase64, `Invoice_${Date.now()}.xlsx`);
}

/* --- SERVER SIDE (Apps Script) --- */
function getTemplateBase64(templateId) {
  const file = DriveApp.getFileById(templateId);
  return {
    base64: Utilities.base64Encode(file.getBlob().getBytes())
  };
}

function saveProcessedFile(base64Content, fileName) {
  const blob = Utilities.newBlob(
    Utilities.base64Decode(base64Content), 
    MimeType.MICROSOFT_EXCEL, 
    fileName
  );
  return { url: DriveApp.createFile(blob).getUrl() };
}

The Trade-off

  • Payload Limits:ย google.script.runย calls can become unstable when the payload exceedsย 50MB.
  • Base64 Inflation:ย Remember that Base64 encoding increases file size by ~33%.

4. The Enterprise Engine (Cloud Functions + Python)

For robust, high-fidelity reporting, we need to leave the Google Sheets conversion pipeline behind. By usingย Google Cloud Functionsย withย Python, we can manipulate native Excel files directly using libraries likeย openpyxl.

The “User Identity” Pattern

Instead of managing complex Service Account permissions, this solution uses theย User’s Identityย to perform Drive operations.

  1. Apps Script: Generates an OIDCย ID Tokenย (for identity), usingย getIdentityToken()) and an OAuthย Access Tokenย (for Drive permissions) withย getOAuthToken().
  2. Cloud Function: Verifies the ID Token and uses the Access Token to initialise the Drive API clientย as the user.

Setup Instructions

1. Google Cloud Function (Python)

  • Deploy the Function:
    • Source:ย cloud-fn.py
    • Runtime: Python 3.x
    • Entry point:ย generate_excel_report
    • Requirements:ย functions-framework,ย google-auth,ย google-api-python-client,ย openpyxl
  • Configure Environment:
    • Openย cloud-fn.pyย and updateย APPS_SCRIPT_CLIENT_ID with your Apps Script’s OAuth Client ID.
      Note: You can find this ID by running the logClientId() helper function in Code.js.

2. Google Apps Script (Code.js)

  • Update Manifest (appsscript.json): Add theย https://www.googleapis.com/auth/userinfo.emailย scope.
  • Configuration: Updateย YOUR_CLOUD_FUNCTION_URLย inย callInvoiceEngine()ย with your deployed function URL.

The Code

Google Apps Script (Code.js)

function callInvoiceEngine() {
    const url = "YOUR_CLOUD_FUNCTION_URL";

    // 1. Get Tokens
    const accessToken = ScriptApp.getOAuthToken();
    const idToken = ScriptApp.getIdentityToken(); // Requires 'openid' scope in manifest

    // --- LOGGING FOR LOCAL TESTING ---
    console.log("--- CREDENTIALS FOR LOCAL TESTING ---");
    console.log("ID Token:", idToken);
    console.log("Access Token:", accessToken);
    console.log("-------------------------------------");

    const payload = {
        templateId: "ID_OF_TEMPLATE_FILE",
        folderId: "ID_OF_DESTINATION_FOLDER",
        // Matches the same dataset used in our other examples
        data: [
            { desc: "Web Development - Phase 1", qty: 40, unit: 100 },
            { desc: "Server Hosting (Annual)", qty: 1, unit: 250},
            { desc: "Domain Registration", qty: 2, unit: 15},
            { desc: "Maintenance Retainer", qty: 10, unit: 85}
        ],
        // The Magic Key: Passing the active user's Access Token for Drive operations
        userToken: accessToken
    };

    const options = {
        method: "post",
        contentType: "application/json",
        headers: {
            "Authorization": `Bearer ${idToken}`
        },
        payload: JSON.stringify(payload)
    };

    UrlFetchApp.fetch(url, options);
}

function logClientId() {
    // Helper to find the Project's OAuth Client ID
    var token = ScriptApp.getOAuthToken();
    var url = 'https://www.googleapis.com/oauth2/v1/tokeninfo?access_token=' + token;
    var response = UrlFetchApp.fetch(url);
    var data = JSON.parse(response.getContentText());
    
    console.log('Client ID:', data.issued_to);
}

Pro Tip: Batching Requests

If you need to generate 50 invoices at once, don’t loop through them one by one. Useย UrlFetchApp.fetchAll(requests)ย to fire off parallel requests to your Cloud Function. Since the heavy lifting happens in the cloud, Apps Script just acts as the orchestrator.

Google Apps Script (appsscript.json)

{
    "oauthScopes": [
        "https://www.googleapis.com/auth/drive",
        "https://www.googleapis.com/auth/script.external_request",
        "https://www.googleapis.com/auth/userinfo.email"
    ]
}

Cloud Function (cloud-fn.py)

import requests
import json

def run_test():
    print("--- Local Cloud Function Tester ---")
    print("Ensure you are running: functions-framework --target=generate_excel_report --source=cloud-fn.py --port=8080\n")

    # 1. Gather Tokens & IDs
    print("Paste your Apps Script Tokens (use Logger.log in GAS):")
    id_token = input("1. ID Token (ScriptApp.getIdentityToken()): ").strip()
    if not id_token: return
    
    access_token = input("2. Access Token (ScriptApp.getOAuthToken()): ").strip()
    if not access_token: return

    template_id = input("3. Google Sheet/Excel Template ID: ").strip()
    folder_id = input("4. Destination Folder ID: ").strip()

    # 2. Prepare Payload
    payload = {
        "templateId": template_id,
        "folderId": folder_id,
        "data": [
            { "desc": "Local Test Item 1", "qty": 1, "unit": 10 },
            { "desc": "Local Test Item 2", "qty": 5, "unit": 20 }
        ],
        "userToken": access_token
    }

    headers = {
        "Authorization": f"Bearer {id_token}",
        "Content-Type": "application/json"
    }

    # 3. Send Request
    url = "http://localhost:8080"
    print(f"\nSending POST request to {url}...")
    
    try:
        response = requests.post(url, json=payload, headers=headers)
        print(f"\nStatus Code: {response.status_code}")
        print(f"Response Body: {response.text}")
            
    except requests.exceptions.ConnectionError:
        print(f"\n[!] Could not connect to {url}.")
        print("Is the functions-framework running?")

if __name__ == "__main__":
    run_test()

Local Test Script (test_request.py)

Before deploying, you can test the entire flow locally to ensure your tokens and permissions are working correctly.

  1. Start the Function:ย functions-framework --target=generate_excel_report --source=cloud-fn.py --port=8080
  2. Run the Tester:ย python3 test_request.pyย (Paste tokens from Apps Script logs when prompted).
import requests
import json

def run_test():
    print("--- Local Cloud Function Tester ---")
    print("Ensure you are running: functions-framework --target=generate_excel_report --source=cloud-fn.py --port=8080\n")

    # 1. Gather Tokens & IDs
    print("Paste your Apps Script Tokens (use Logger.log in GAS):")
    id_token = input("1. ID Token (ScriptApp.getIdentityToken()): ").strip()
    if not id_token: return
    
    access_token = input("2. Access Token (ScriptApp.getOAuthToken()): ").strip()
    if not access_token: return

    template_id = input("3. Google Sheet/Excel Template ID: ").strip()
    folder_id = input("4. Destination Folder ID: ").strip()

    # 2. Prepare Payload
    payload = {
        "templateId": template_id,
        "folderId": folder_id,
        "data": [
            { "desc": "Local Test Item 1", "qty": 1, "unit": 10 },
            { "desc": "Local Test Item 2", "qty": 5, "unit": 20 }
        ],
        "userToken": access_token
    }

    headers = {
        "Authorization": f"Bearer {id_token}",
        "Content-Type": "application/json"
    }

    # 3. Send Request
    url = "http://localhost:8080"
    print(f"\nSending POST request to {url}...")
    
    try:
        response = requests.post(url, json=payload, headers=headers)
        print(f"\nStatus Code: {response.status_code}")
        print(f"Response Body: {response.text}")
            
    except requests.exceptions.ConnectionError:
        print(f"\n[!] Could not connect to {url}.")
        print("Is the functions-framework running?")

if __name__ == "__main__":
    run_test()

Why This Wins

  • True Excel Support:ย You are editing the actual binary file, not a conversion.
  • Separation of Concerns:ย The heavy lifting is done in the cloud, not in the browser or the Apps Script runtime.

Summary: Which Tool for Which Job?

Feature AppSheet Apps Script (Native) Client-Side (ExcelJS) Cloud Functions (Python)
Complexity Very Low Low High High
Cost Free Free Free GCP Usage (Low)
Best For Standard Workflows Simple Reports Interactive Template Fills Enterprise Reports

Final Thoughts

There is no “one size fits all” here. The “Excel Requirement” is a spectrum:

  • For quick internal tools:ย Stick toย Method 1 (AppSheet) andย Method 2 (Native). Itโ€™s fast to build and free.
  • For polished client reports:ย Method 3 (ExcelJS)ย is your best friend. It keeps the heavy lifting in the browser and preserves your branding.
  • For enterprise scale:ย If you are generating hundreds of invoices a week,ย Method 4 (Cloud Functions)ย is the robust choice. It decouples the generation logic from the spreadsheet UI.

Choose the architecture that fits your volume and your “pixel-perfect” tolerance. I’m also keen to hear have got another ‘Excel Generator’ approach? Happy scripting!

The Eject Button: How to Write Portable Apps Script Code for the Google Cloud

As Google Apps Script developers, we live in a world of incredible convenience. Services like DriveApp, SpreadsheetApp, and GmailApp are powerful, intuitive, and deeply integrated into Google Workspace. They allow us to build solutions with remarkable speed.

But this convenience comes with a trade-off: our code becomes tightly coupled to the Apps Script runtime. When you write DriveApp.getFiles(), you’re writing code that can only ever run inside Apps Script.

What happens when you hit a wall? Your script might need more than the 30-minute execution limit, require more memory than the shared environment provides, or need to handle a level of concurrency that Apps Script isn’t designed for. In these moments, you need an “eject button”โ€”a way to lift your code out of Apps Script and into a more scalable environment like Google Cloud Run, without starting from scratch.

This article is a guide to a professional workflow that makes this possible. It’s about writing portable Apps Script code from day one, so you’re always ready for the cloud.

The Portability Problem: Built-in Services vs. Raw APIs

The core of the issue lies in how we interact with Google’s services.

  • Built-in Services (DriveApp, etc.): These are high-level abstractions. They provide incredibly useful helper functions (like getBlob()) that handle complex operations behind the scenes. However, they are a “black box” and exist only in Apps Script. For a fascinating look at the work involved in unpacking what these services do, check out Bruce Mcpherson’s gas-fakes project, which emulates these services for local testing.
  • Direct API Calls: The alternative is to interact directly with the underlying Google Drive API (or Sheets API, etc.). This gives you granular control but requires you to handle raw HTTP requests with UrlFetchApp, manage authentication tokens, and implement your own error handling like exponential backoff.

Let’s be clear: this isn’t a call to abandon the built-in services. Far from it. The built-in services are indispensable for anything that interacts directly with the user’s live session. Examples include creating custom menus, displaying dialogs with HtmlService, acting on an onEdit(e) event object, or manipulating the user’s cursor position. For these tasks, the built-in services are not just the best choice; they are often the only choice. The “portable philosophy” is about being strategic. Itโ€™s about identifying the core, data-processing engine of your scriptโ€”the part you suspect might one day need more power or timeโ€”and deliberately building that piece for portability.

Writing portable code means finding a middle ground: the convenience of a high-level interface with the cross-platform nature of direct API calls.

The Solution: An Abstraction Layer with Client Libraries

The secret to portability is to abstract away the platform-specific parts of your code. Instead of using the built-in services, you can use client libraries that work in both Apps Script and a standard Node.js environment.

  1. In Apps Script: You can use the Google API Client Library Generator for Apps Script libraries. This repository includes over 400 Apps Script client libraries for Google APIs that provide a familiar, object-oriented interface (e.g., drive.files.list()) but handle the UrlFetchApp and token logic for you.
  2. In Node.js (for Cloud Run): You use the official Google API Node.js Client Libraries (e.g., googleapis). These libraries are the industry standard and provide the exact same structural interface (e.g., drive.files.list()).

A Real-World Example: Bulk PDF Generation

Let’s imagine a common business need: a script that takes data from a Google Sheet to generate hundreds of personalized offer letters as PDFs from a Google Doc template. Doing this one-by-one in Apps Script would be slow and might time out. This is a perfect candidate for the “eject button.”

Here is how we can write a single, portable function for the core logic.

The Portable Core Logic

This function contains the business logic. It’s agnostic to its environment; it only needs an initialized driveClient and docsClient to do its work. To ‘see’ what this looks like view this Apps Script project which has already had the Drive and Docs client libraries from the client library generator build directory.

/**
 * PORTABLE CORE LOGIC
 * This function is almost perfectly portable between Apps Script and Node.js.
 * @param {object} job The job details (templateId, replacements, etc.).
 * @param {object} driveClient An initialized Drive API client.
 * @param {object} docsClient An initialized Docs API client.
 * @param {object} logger A logger object (like `console`).
 */
async function _portablePdfGeneratorLogic(job, driveClient, docsClient, logger) {
  const { templateId, destinationFolderId, replacements, newFileName } = job;
  let newFileId = null;

  try {
    // 1. Copy the template document
    logger.log(`Copying template: ${templateId}`);
    // NOTE for Node.js: The response is often nested, e.g., `response.data.id`
    const copyResponse = await driveClient.files.copy({
      fileId: templateId,
      requestBody: { name: newFileName },
    });
    newFileId = copyResponse.id || copyResponse.data.id;

    // 2. Perform the text replacements in the new document
    logger.log(`Replacing text in new file: ${newFileId}`);
    await docsClient.documents.batchUpdate({
      documentId: newFileId,
      requestBody: { requests: replacements },
    });

    // 3. Export the document as a PDF
    logger.log(`Exporting file as PDF...`);
    // NOTE for Node.js: The response is a stream, not a blob.
    const pdfResponse = await driveClient.files.export({
      fileId: newFileId,
      mimeType: 'application/pdf',
    }, { responseType: 'stream' });

    // 4. Create the final PDF file in the destination folder
    logger.log(`Creating PDF file in folder: ${destinationFolderId}`);
    await driveClient.files.create({
      requestBody: {
        name: `${newFileName}.pdf`,
        parents: [destinationFolderId],
      },
      media: {
        mimeType: 'application/pdf',
        body: pdfResponse.body || pdfResponse.data, // Accommodate both runtimes
      },
      fields: 'id',
    });

    logger.log(`Successfully created PDF for ${newFileName}`);
    return { status: 'success' };

  } catch (error) {
    const errorMessage = error.response ? JSON.stringify(error.response.data) : error.message;
    logger.error(`[Core Logic] Failed: ${errorMessage}`);
    return { status: 'error', reason: errorMessage };
  } finally {
    // 5. Clean up the temporary Google Doc
    if (newFileId) {
      logger.log(`Cleaning up temporary file: ${newFileId}`);
      await driveClient.files.delete({ fileId: newFileId });
    }
  }
}

The Platform-Specific “Bootstrap” Code

The only part that needs to change is the code that initializes the clients and calls the core logic.

In Apps Script (Code.gs for testing and delegation):

/**
 * This function is for testing the portable logic *within* Apps Script.
 */
function runPdfJobInAppsScript(job) {
  // 1. Initialize the Apps Script community client libraries
  // These libraries automatically use the user's token via ScriptApp.getOAuthToken()
  const driveClient = new Drive(); // Assumes Drive.gs is in the project
  const docsClient = new Docs();   // Assumes Docs.gs is in the project

  // 2. Call the portable logic
  _portablePdfGeneratorLogic(job, driveClient, docsClient, Logger);
}
/**
 * This function delegates a job to a Cloud Run service, passing the user's
 * OAuth token to extend the "run as user" paradigm.
 */
function delegateJobToCloudRun(job) {
  const CLOUD_RUN_URL = 'https://your-service-url.a.run.app';
  
  const options = {
    method: 'post',
    contentType: 'application/json',
    // Get the user's OAuth token and pass it in the Authorization header.
    headers: {
      Authorization: 'Bearer ' + ScriptApp.getOAuthToken(),
    },
    payload: JSON.stringify(job),
    muteHttpExceptions: true,
  };
  
  const response = UrlFetchApp.fetch(CLOUD_RUN_URL, options);
  Logger.log(response.getContentText());
}

In Node.js (index.js for Cloud Run):

In our Node.js server, we’ll use the OAuth2Client from the google-auth-library. While many Cloud Run examples use GoogleAuth for service accounts, OAuth2Client is specifically designed to work with user-provided OAuth tokens, allowing us to seamlessly continue acting on behalf of the original user.

// Import OAuth2Client instead of GoogleAuth for this purpose
const { google } = require('googleapis');
const { OAuth2Client } = require('google-auth-library'); // ๐Ÿ‘ˆ Change this line
const express = require('express');

const app = express();
app.use(express.json());
const PORT = process.env.PORT || 8080;

// --- Main Express Route Handler ---
app.post('/', async (req, res) => {
  // 1. Extract the token from the Authorization header
  const authHeader = req.headers.authorization;
  if (!authHeader || !authHeader.startsWith('Bearer ')) {
    return res.status(401).send('Unauthorized: Missing or invalid Authorization header.');
  }
  const userToken = authHeader.split(' ')[1];

  const { job } = req.body;
  if (!job) {
    return res.status(400).send('Invalid payload. Expected JSON with a "job" object.');
  }

  try {
    // 2. Create an OAuth2Client instance
    const auth = new OAuth2Client();

    // 3. Set the credentials using the token from Apps Script (or swap out for a service account config)
    auth.setCredentials({
      access_token: userToken,
    });

    // 4. Initialize the Google clients with the user-authed client
    const driveClient = google.drive({ version: 'v3', auth });
    const docsClient = google.docs({ version: 'v1', auth });

    // Now, any calls made with driveClient or docsClient will act on
    // behalf of the user who ran the Apps Script. ๐Ÿš€
    const result = await _portablePdfGeneratorLogic(job, driveClient, docsClient, console);

    if (result.status === 'success') {
      res.status(200).send('PDF generated successfully.');
    } else {
      res.status(500).send(`Failed to generate PDF: ${result.reason}`);
    }
  } catch (err) {
    console.error(err);
    // Check for authentication errors specifically
    if (err.code === 401 || err.code === 403) {
      res.status(401).send('Authentication error with Google APIs. The token may be expired or invalid.');
    } else {
      res.status(500).send('An unexpected error occurred.');
    }
  }
});

app.listen(PORT, () => {
  console.log(`PDF generator service listening on port ${PORT}`);
  console.log('Ready to receive a test request...');
});

// (Paste the _portablePdfGeneratorLogic function here)
}

Conclusion: Start Portable, Scale with Confidence

The “eject button” is your strategic advantage, transforming Apps Script from just a scripting environment into the first stage of a professional development lifecycle. By separating your core logic from the convenient but platform-specific built-in services, you give your applications a future-proof foundation.

The key takeaway is simple: write your business logic for the Google APIs, not for the Apps Script runtime.

Your Next Step:The next time you start a project in Apps Script, challenge yourself to write just one core function in this portable style. You’ll not only prepare your code for future scaling but also gain a deeper understanding of the Google APIs themselves.