When and how to use Application default credentials for Google API auth, with example scripts to set them up and example code to consume them
In my recent post, ‘The Eject Button‘, I explored the idea of writing Apps Script code that can be easily moved to other environments like Google Cloud. This was inspired by the seamless local development workflows available in other languages, which begs the question: how can Apps Script developers replicate that experience?
A big piece of that puzzle is authentication. How do you securely test code on your local machine that needs to talk to Google APIs?
Google Workspace Developer Expert Bruce Mcpherson provides the answer in his excellent guide, ‘Application Default Credentials with Google Cloud and Workspace APIs‘. His post is the perfect starting point for any developer looking to streamline their workflow. The key takeaway is that by using the Google Cloud CLI, your local code can securely use your own credentials to access Google APIs.
When you combine ADC for authenticating real API calls with his gas-fakes mocking library for simulating Apps Script services, you have a powerful toolkit that brings a professional development cycle to the Apps Script world.
If you’re looking to level up your skills and knowledge, I highly recommend diving into Bruce’s article.
A step-by-step guide to dynamically import, filter, and format your data.
How many times have you found yourself copying data from one sheet to another, applying filters, and then manually formatting everything as a table to make it more readable and functional? It is a sometimes tedious and error-prone process.
What if we could automate all of this with a single click? Welcome to the world of Google Apps Script!
In this article, we will analyze a script that not only imports and filters data between two spreadsheets but also uses the power of the Sheets API to dynamically create a formatted table. Ready? Let’s start! 🚀
What does the script do?
In summary, our script performs these steps in sequence:
Connects to a source spreadsheet (even one different from where the script is located).
Imports all the data from the specified sheet.
Filters the rows based on a specific condition (in our case, a numeric value in a column).
Clears the destination sheet and writes the filtered data to it.
Creates (or recreates) a formatted table that perfectly adapts to the size of the new data.
The Sample File
To follow this tutorial, you can create a copy of the sample spreadsheet:
The file contains the source sheet DataSet with the starting data. In your destination sheet, you can, for example, use a sheet named Filtered where the filtered data will be inserted. Nothing prevents you from using this script to filter and create a table in the same file. In any case, for my example, you will need the file I linked and a second file where you import this data.
In the script we will analyze, the filter is applied to the “Billing” column, selecting only rows with a value greater than 2000.
Before starting, there is a fundamental step. Our script uses advanced methods that are not part of the standard SpreadsheetApp service, but of the advanced Sheets API service.
To enable it:
Open the Apps Script editor.
In the left menu, click on Services (+).
Find Google Sheets API in the list, select it, and click Add.
Perfect! Now your script has the “superpowers” to manipulate tables, conditional formatting, and much more.
Script Analysis
Here is the complete script that you will need to copy and paste into your file:
function importFilterCreateTable() {
    const idOrigin = "ID_FILE"; // Source File ID
    const nameOrigin = "DataSet"; // source sheet name
    const nameDest = "Filtered" // destination sheet name
    const indexCol = "Billing" // name of Column to filter
    const nameTable = "TBL_Filtered" // name of the table

    const ss = SpreadsheetApp.getActive();
    const sheetOrigin = SpreadsheetApp.openById(idOrigin).getSheetByName(nameOrigin);
    const sheetDest = ss.getSheetByName(nameDest);
    const destID = sheetDest.getSheetId();

    // Import & Filter the data
    const values = sheetOrigin.getDataRange().getValues();

    const col = values[0].indexOf(indexCol); // Find the column number to filter

    const filterValues = values.filter((rw, h) => h === 0 || rw[col] > 2000); //Filter by condition

    if (!filterValues.length) return;

    // Retrieve the table data via the Sheets API
    const ssObj = Sheets.Spreadsheets.get(ss.getId(), { includeGridData: false });
    const sheetObj = ssObj.sheets.find(s => s.properties.sheetId === destID);

    const requests = [];

    // Checks if the table exists, if so it deletes it
    if (sheetObj.tables) {
        const table = sheetObj.tables[0];
        requests.push({ deleteTable: { tableId: table.tableId } });
    }

    // Adds the new data
    sheetDest.getRange(1, 1, filterValues.length, filterValues[0].length).setValues(filterValues);

    // Adds a new table
    requests.push({
        addTable: {
            table: {
                name: nameTable,
                range: {
                    sheetId: destID,
                    startRowIndex: 0,
                    endRowIndex: filterValues.length,
                    startColumnIndex: 0,
                    endColumnIndex: filterValues[0].length
                }
            }
        }
    });

    if (requests.length) {
        Sheets.Spreadsheets.batchUpdate({ requests }, ss.getId());
    }
}
💪🏻Let’s analyze the interesting part about the table.
The Creation of the Table
This is the most interesting and powerful part of the script. The standard SpreadsheetApp service does not have a direct method like sheet.createTable(). To do this, we need to speak directly with the Google Sheets API.
How does it work?
Sheets.Spreadsheets.get(ss.getId(), { includeGridData: false }); With this line, we ask the API to provide us with all the properties of our spreadsheet (like the sheets within it, their IDs, and of course, the existing tables), but without downloading the cell data (includeGridData: false), making the call much faster.
ssObj.sheets.find(s => s.properties.sheetId === destID); From the object we have received, we look for the specific sheet we are working on by comparing its ID (destID).
Preventive deletion: if (sheetObj.tables) Our script is designed to be run multiple times. For simplicity, we delete the old table before creating a new one. How? This block of code checks if a table already exists in the sheetObj sheet (sheetObj.tables). If so, it adds a deletion request (deleteTable) to an array of “requests” (requests).
Creation: requests.push({ addTable: { ... } }); We add a second request to our array: the creation of the new table (addTable). Here we define all its properties:
name: The unique name of the table.
range: The cell range it will occupy. It is crucial to note that the API uses “zero-based” indexes (the first row/column is 0) and the final index (endRowIndex) is excluded. This is why filterValues.length works perfectly to define the last row.
📌 In this example, the table will be placed in cell A1. If you want the table to appear in a different row, for example in row 3 of a column, you must set startRowIndex: 2 and endRowIndex: filterValues.length + 2. If you want it in a different column instead, for example in column D, you will have to put startColumnIndex: 3 and endColumnIndex: filterValues[0].length + 3.
Sheets.Spreadsheets.batchUpdate({ requests }, ss.getId()); This is the final call. Instead of making one API call to delete and another to create, we group them into a single batchUpdate. It is more efficient and ensures that the operations are performed in sequence.
This “delete and recreate” approach is extremely robust and ensures that the table always has the exact dimensions of the filtered data. The previous data? It will be removed when we delete the table. In fact, it is only after possibly deleting the table that the new data will be inserted.
Updating an Existing Table
What if we just wanted to update the dimensions of an existing table instead of deleting and recreating it? In this case, the import and filter logic remains the same, but the table manipulation part changes.
This method becomes useful when your table already has a structure that you want to preserve (special formatting, data validation, drop-down menus, etc.) and you just want to update its data and dimensions.
Here is what the final part of the script would look like in this case:
Instead of deleting and creating, we use an updateTable request.
We must specify the ID of the table to be modified (tableId).
The fields: "range" field is crucial: it tells the API to update only and exclusively the range property of the table, leaving everything else (like the name) unchanged.
Conclusion
Which method to choose? It always depends on the use you want to make of it, so it depends a lot on your needs. Remembering that the “delete and recreate” method of the first script is generally used if we always want to have a new and clean table, while the second case is useful when we have already structured our table.
Automating tasks in Google Sheets with Apps Script can save you hours of work. Learning to use the Sheets API opens up a world of possibilities that go far beyond simple data manipulation, allowing you to programmatically control almost every aspect of your spreadsheets.
A Google Apps Script wrapper for the Google AppSheet API – bienlim/AppSheetApp
Recently I had a nice ping into my LinkedIn feed from App Developer Bien Lim. Bien has enhanced my original AppSheetApp library for Apps Script with a powerful new feature: fetchAll(). This addition lets you run multiple AppSheet API calls at the same time, significantly boosting the performance of your Apps Script integrations.
Building on the library’s existing methods like Add, Delete, Edit, and Find, this new function allows developers to execute these calls in parallel. This can drastically reduce execution time, which is a big improvement for applications that rely on multiple API operations.
You can find the updated library on the code repository to start using this new feature today.
Example Code
Here is a snippet showing how you can use the new fetchAll() method:
/**
 * Executes multiple AppSheet API requests in parallel.
 * This example shows how to perform Add, Delete, Edit, and Find operations simultaneously.
 */
function parallelRequest(){
  // Replace with your actual App ID and Access Key
  const AppSheet = new AppSheetApp('YOUR_APP_ID', 'YOUR_ACCESS_KEY');

  // Placeholder data for demonstration
  const properties = { "Locale": "en-US" };

  // Sample data for adding a new record. The key field is usually omitted if it's auto-generated.
  const dataToAdd = [{"Name": "John Doe", "Age": 30}];

  // Sample data for editing an existing record. The key field is required to identify the row.
  const dataToEdit = [{"ID": "unique-id-123", "Age": 31}];

  // Sample data for deleting an existing record. The key field is required.
  const dataToDelete = [{"ID": "unique-id-456"}];

  // The FetchAll method takes multiple API calls as arguments.
  // The 'true' argument tells each method to return a parameter object instead of
  // making an immediate API call. These parameter objects are then passed to fetchAll().
  const responses = AppSheet.fetchAll(
    AppSheet.Add('People', dataToAdd, properties, true),
    AppSheet.Delete('People', dataToDelete, properties, true),
    AppSheet.Edit('People', dataToEdit, properties, true),
    AppSheet.Find('People', [], properties, true)
  );

  // The responses are returned in an array, in the same order as the requests.
  const [ respFromAdd, respFromDelete, respFromEdit, respFromFind ] = responses;

  // You can now handle each response individually
  console.log('Add Response:', respFromAdd);
  console.log('Delete Response:', respFromDelete);
  console.log('Edit Response:', respFromEdit);
  console.log('Find Response:', respFromFind);
}
As developers, we are constantly looking for ways to improve our workflow and the quality of our code. The recent rise of powerful AI assistants, like Google’s Gemini, has opened up new frontiers for productivity, particularly in the realm of code reviews. These tools can offer instant feedback, suggest optimisations, and spot potential bugs we might have missed.
However, there’s often a practical hurdle: providing the AI with the complete context of our project. For Google Apps Script developers, this can mean the tedious process of copying and pasting code from multiple .gs and .html files, not to mention the crucial appsscript.json manifest.
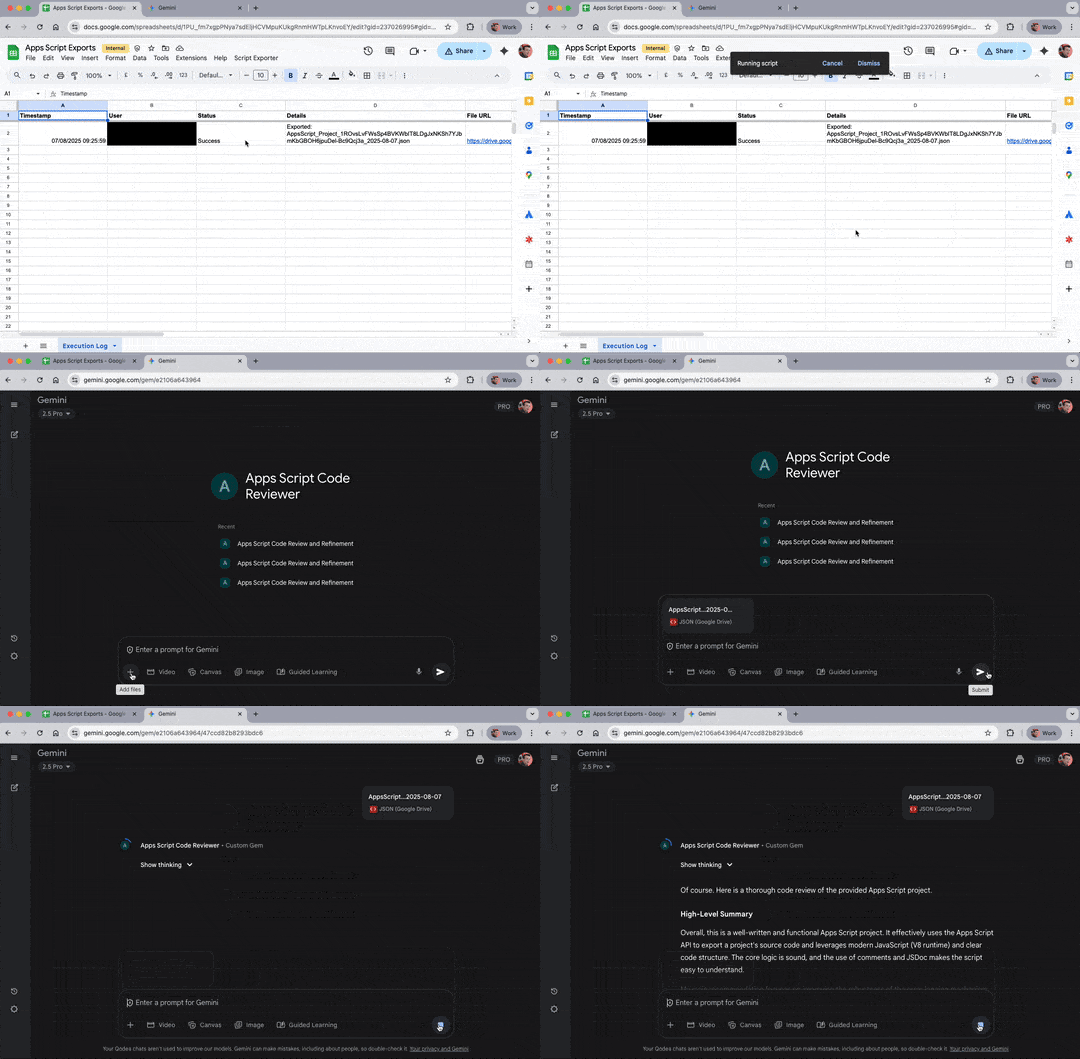
To solve this, I’ve developed a simple tool built, fittingly, with Apps Script itself. It’s a Google Sheet that lets you export an entire Apps Script project into a single, neatly formatted JSON file, ready to be added directly to the Gemini App or a Gemini Gem.
Why This Approach?
Holistic Reviews: By packaging every file—including the manifest with its scopes and dependencies—you give the AI the bigger picture leading to more accurate analysis.
Boosted Efficiency: Forget manual copy-pasting. A couple of clicks are all it takes to get a complete project export, saving you time and preventing errors.
How It Works & How to Prompt Gemini
To get the most out of your exported project file, it helps to understand its structure and how to tell your AI assistant what it’s looking at.
The JSON Structure
The tool uses the official Google Apps Script API to fetch your project’s content. The resulting .json file contains a list (an array) of File objects. Based on the official documentation, each object in the list represents one file from your project and looks something like this:
name: The name of the file (e.g., “Code”, “Index”, “appsscript”).
type: The kind of file it is. This will be SERVER_JS for .gs files, HTML for .html files, and JSON for the appsscript.json manifest.
source: The actual code or content of the file as a string.
Prompting Gemini for the Best Results
When you upload this file, you can give Gemini a simple instruction to ensure it understands the context. Here is a sample prompt you can adapt:
“Please review the attached Google Apps Script project. The JSON file contains an array of file objects, where each object has a ‘name’, ‘type’, and ‘source’. Please analyse all the files together as a single project to provide a comprehensive review.”
This prompt tells Gemini exactly how to interpret the file, ensuring it sees the appsscript.json manifest for its scopes, the server-side logic in the .gs files, and any client-side .html files as a complete, interconnected project.
Tip: For scripts bound to a Google Sheets, Docs, or Slides, to get the most accurate review, add these documents to your Gemini conversation alongside the exported JSON file to give Gemini the complete context.
Take It to the Next Level: Create a Custom Gem
To save even more time, you can embed these instructions into a custom Gem in the Gemini App. This creates a reusable ‘persona’ for your code reviews. When creating your Gem, you can provide it with more detailed instructions to focus its analysis.
Here is a more advanced set of instructions you could use for your “Apps Script Code Reviewer” Gem:
You are an expert Google Apps Script developer who specialises in writing clean, efficient, and secure code.

When I provide a JSON file, it will represent a complete Apps Script project. The file contains an array of file objects, each with a 'name', 'type', and 'source'.

Your task is to perform a thorough code review of the entire project. Please analyse all files together.

Specifically, focus on:

1. **Best Practices:** Check if the code follows the official Google Apps Script style guide and modern JavaScript (ES6+) conventions.
2. **Performance:** Identify any potential bottlenecks, inefficient loops, or excessive API calls.
3. **Security:** Look for any potential security vulnerabilities, especially concerning data handling and web app permissions.
4. **Clarity and Readability:** Assess the code for clarity, and check for adequate comments and meaningful variable names.

Please provide your feedback in a structured format, starting with a high-level summary and then a detailed list of suggestions, grouped by file.

If you are suggesting code revisions, provide the fully revised file.
Getting Started
Here’s how to set up your own Apps Script project exporter.
Step 1: Prerequisites – Enabling the Apps Script API
The tool relies on the Apps Script API to fetch project files. To use it, you first need to link your script project to a Google Cloud Platform (GCP) project where the API is enabled.
Create a GCP Project: If you don’t already have one, create a standard GCP project by visiting the Google Cloud Console.
Enable the Apps Script API: Within your GCP project, navigate to the “APIs & Services” dashboard, click “+ ENABLE APIS AND SERVICES”, search for “Google Apps Script API”, and enable it.
Configure the OAuth Consent Screen: Before the script can be authorised, you must configure the consent screen.
In the GCP Console, navigate to “APIs & Services” > “OAuth consent screen”.
Choose Internal for the User Type and click Create.
Fill in the required fields (App name, User support email, and Developer contact information) and click Save and Continue. No other configuration is needed. As this is for internal use, you do not need to submit the app for verification.
Link to Your Apps Script Project:
Open your Apps Script project (the one containing the exporter code).
Go to “Project Settings” (the cog icon ⚙️).
Under “Google Cloud Platform (GCP) Project”, click “Change project” and enter your GCP project number.
Step 2: Setting Up the Exporter Sheet
Make a Copy: Click this link to make your own copy of the pre-configured Google Sheet Template.
Configure the Destination Folder:
In your new sheet, go to Extensions > Apps Script.
In the Code.gs file, find the line const DEST_FOLDER_ID = '...';
Replace the placeholder ID with the ID of the Google Drive folder where you want your JSON exports to be saved. You can get this from the folder’s URL (it’s the string of characters after folders/). Tip: Your copy of this template can be shared with your colleagues. Also share the folder with them so that the script can write the export file.
Save and Authorise: Save the script project. Return to your sheet and reload the page. A new “Script Exporter” menu will appear. The first time you run it, you will be prompted to authorise the script’s required permissions.
Step 3: Exporting Your First Project
Using the tool is the easiest part!
Find the Script ID: First, you need the ID of the project you wish to review. The easiest way to find this is by copying it from the script editor’s URL.
For standalone scripts: The URL will look like https://script.google.com/d/THIS_IS_THE_ID/edit. The ID is the long string of characters between /d/ and /edit.
For container-bound scripts (in a Sheet, Doc, etc.): From your Google Sheet or Doc, open the script editor via Extensions > Apps Script. The URL in this new browser tab will have the same format. Copy the ID from there.
Run the Exporter: In your exporter sheet, click Script Exporter > Export Script Project.
Paste the ID: When the dialog box appears, paste in the Script ID you just copied and click OK.
Check the Output: The script will fetch the project files, create a JSON file in your designated Drive folder, and confirm with a success message. A log of the export, including a link to the file, will be automatically added to the “Execution Log” sheet.
You can now head over to the Gemini App (gemini.google.com), add the JSON file from Google Drive, and start your comprehensive code review!
I hope you find this tool as useful, it’s a small optimisation, but one that hopefully makes integrating Gemini for Workspace into our daily Apps Script development practices that much smoother. I’d love to hear if you use this or similar approaches and any other tips you have for Gemini assisted Google Workspace development. Happy scripting!
🤖 AI-powered Gmail assistant that automatically analyzes emails and drafts responses using Google’s Gemini AI
Google is rapidly integrating Gemini across the Workspace platform, bringing powerful AI features directly into the tools we use every day. While these native integrations offer incredible value, developer-led solutions provide a tantalising glimpse into the future of hyper-personalised automation, especially as we look toward the potential of the new Google Workspace Flows. This is where the real magic begins, allowing for custom agents that can handle complex, multi-step tasks.
Google Developer Advocate Zack Akil has created one such example solution that turns your Gmail inbox into a smart, automated assistant. His open-source project, the “AI-got-this-gmail-delegator,” is a Google Apps Script that uses the Gemini API to analyse incoming emails, categorise them, and even draft replies based on your own knowledge and writing style.
This project is a great example of how to combine the power of Google Workspace automation with the intelligence of modern AI. The script works by:
Analysing Incoming Emails: When a new email arrives, the script sends the content to the Gemini API for analysis.
Providing Context: The AI’s analysis is guided by a “knowledge base” that you provide in a Google Doc. This could include your role, common responses, or specific project details.
Intelligent Triage: Based on the email’s content and your knowledge base, the script decides whether the email needs a reply, requires manual intervention, or can be archived.
Drafting Replies: For emails that need a response, the script uses Gemini to generate a draft reply in your own writing style, ready for you to review and send.
The entire process is logged in a Google Sheet, giving you a complete overview of your AI assistant’s activity.
What makes this project so compelling is its practicality and customisability. By modifying the Google Doc knowledge base and the writing style prompts, you can create a personalised email assistant that understands the nuances of your work.
To explore the code and set up your own AI email delegator, check out the project on GitHub.
In this video we build a Chat app as a Google Workspace add-on with Apps Script and extend it to other Workspace applications (Calendar, Gmail, Drive, Docs, Sheets, and Slides).
To see this new framework in action, Pierrick Voulet from the Google Developer Relations team has released a fantastic video tutorial, ‘Build a Chat app as a Google Workspace add-on with Apps Script’.
The ‘OOO Assistant’: A Practical Demonstration
The video centres on building an ‘Out-of-Office Assistant’ that can block out the user’s Calendar for the day and set a Gmail out-of-office auto-reply. The real magic is how this Chat-based logic extends into a full Workspace Add-on, available in the sidebars of Gmail, Calendar, Drive, Docs, Sheets and Slides. This is achieved with minimal code changes, primarily by configuring the appsscript.json manifest to include:
A homepageTrigger to display a UI card in the add-on sidebar.
universalActions that reuse the exact same functions (blockDayOut(), setAutoReply()) originally built for the Chat quick commands.
The video provides a complete overview of the process, and you can get hands-on with the shared code yourself. For more technical details, check out the official Extend Google Chat documentation.
Learn how to add, update and search or query for custom Google Drive properties in file metadata in with Google Apps Script
Managing and searching for project files in Google Drive can be a challenge, especially when naming conventions are not followed. While Google’s Drive Labels API offers a solution, its use is often restricted to administrators, leaving many developers looking for a more accessible alternative.
Over on his blog, Yagisanatode, developer Scott Donald provides an in-depth tutorial on using custom file properties with Apps Script. This technique allows you to programme-matically attach your own searchable metadata—like a project ID, version number, or status—to any file in Drive.
The tutorial walks you through the entire process, including:
Enabling the Drive API v3 advanced service.
Using Drive.Files.update() to add properties to a file.
Crafting queries with Drive.Files.list() to find files based on your custom properties.
For developers working at scale, the tutorial also covers how to avoid slow, iterative updates. Scott introduces a powerful batch update method that uses UrlFetchApp to efficiently modify thousands of files in a single request.
This is an excellent, practical guide for any intermediate developer looking to build more organised and robust file management systems in Google Drive.
Nine years ago, I wrote an article describing how to scrape data from the internet in about five minutes. It featured a Google Apps Script library that allowed you to specify what to download from a webpage by identifying the text surrounding your target information. This became one of my most-read articles, and the library itself saved me a significant amount of time.
With the advent of large language models like Gemini, this entire paradigm is shifting. Just as “vibe coding” describes a more intuitive approach to programming, I’d say we’re now entering an era of “vibe-scraping.”
Using data from the web has long been a staple. But what if you could just describe the information you want and have an AI fetch it for you?
Google Developer Expert, Ivan Kutil, introduces a modern approach he calls “vibe scraping.” In his latest post, he demonstrates a powerful method that combines Google Apps Script with the Gemini API to pull structured data from any webpage directly into a Google Sheet.
A Practical Example: From Movie Links to a Full Database
To understand the power of this technique, Ivan set out to solve an old problem. He had a Google Sheet with a list of movies, each with a URL pointing to its page on ČSFD (a popular Czech-Slovak film database). His goal was to automatically populate columns with details like genre and rating by extracting the data directly from those linked pages.
At the heart of his solution is a new, experimental Gemini API feature called the URL Context tool. As the documentation notes, this tool is surprisingly flexible: it “can then retrieve content from the URLs and use that content to inform and shape its response.”
The tool can be used in two main ways:
URL Context “By Itself”: In this mode, the tool directly fetches and processes the content from the URL you provide. This is a straightforward way to analyze the live content of a single page.
URL Context with Google Search Grounding: In this mode, the tool can read content from a URL and then use Google Search for a more in-depth understanding.
What makes Ivan’s script so elegant is how it combines this tool with the simplicity of Google Sheets. For each row, the script constructs a prompt for the Gemini API, asking it to analyse the content of the provided URL and find the specific information defined in the spreadsheet headers.
The result is a system where modifying your data query is as easy as renaming a column. This turns a potentially complex scraping task into a simple spreadsheet edit, allowing anyone to create powerful, custom data importers.
To get the full details and the code to build this yourself, check out Ivan’s original post.
Last month, we introduced the ability to take basic actions to create and modify tables via the Google Sheets API. This week, we’re expanding the API functionality to include the ability to write and read file and people smart chips.
Following last month’s update for tables, it was recently announced that the Google Sheets API now allows developers interact with the file and people smart chips. This update provides developers with direct access to manage these types of smart chips, which were previously only available through the user interface. For detailed documentation and code snippets on implementation, refer to the official Google Developers support page.
Here is a quick overview of what you can do:
Reading Smart Chips: You can retrieve data for all smart chips within a cell. The API response will detail the properties for chipped sections of text and will also identify the plain text sections of the cell. As noted in the documentation to get the chip’s display text, you must request the formattedValue.
Adding Smart Chips: You can now insert smart chips for people and files into cells.
People Chips: These can be created to link to an individual using their email address. You can also specify the display format for the person’s name.
Rich Link Chips: These can be used to create a chip that links to a Google Drive file. Note that writing these chips requires your application to have at least one Drive OAuth scope.
In the feature image above you can hopefully see how a recruitment tracker could be created and read. In the example people chips are used for the ‘Applicant’ and ‘Interviewer’ columns, providing immediate access to contact information. A file chip is used in the ‘Resume’ column to link directly to the candidate’s document in Google Drive. A developer could automate this entire process. For instance, a script could be triggered when a new application is submitted, automatically adding a new row to the tracker complete with the relevant person and file chips, streamlining the entire recruitment workflow.
For those using Google Apps Script, these new functionalities are accessible via the Google Sheets Advanced Service. This update provides better methods for managing smart chips in Google Sheets.
As powerful as Google’s new AI tools are, those of us who live in Google Workspace have likely encountered some of their current limitations. One of the most significant for me is in Google Chat. While Gemini can analyse recent conversations, it seems to be limited to roughly the last 20 messages or 7 days of history. Crucially, it also can’t see or process messages sent by apps or webhooks, which are often the lifeblood of a technical team’s space.
This creates a knowledge gap. How can you analyse project history, debug an automated alert, or get a complete overview of a conversation if your tools only see a fraction of the data?
To solve this I’ve created an automated solution using Google Apps Script. This tool can archive an entire Google Chat space history into two powerful, synchronised formats:
A structured JSON file that serves as the definitive, machine-readable “source of truth”.
A clean, human-readable Google Doc, which is automatically generated from the JSON data.
This dual-output approach provides the best of both worlds: a portable data file perfect for backups or analysis, and a browsable document ideal for quick searches or for use as a direct data source in a Gemini Gem or other tools like NotebookLM.
Best of all, once configured, you can set up a time-driven trigger to run the script automatically, ensuring your archives are always kept up-to-date without any manual intervention.
Prerequisites
Before you begin, please ensure you have the following:
A Google Workspace Account: For setup this can only be a Google Workspace account, once it is configured it is possible to test with a personal consumer Gmail account.
Access to Google Cloud Platform (GCP): You will need the ability to create a new GCP project and enable APIs. The guide below will walk you through creating a fresh project, but if you are using a Google Workspace account, you may need to request a project depending on your organisation’s policies.
User-Based Access: This script runs as you, the user who authorises it. Therefore, it will only be able to see and archive Google Chat spaces that you are a member of.
The Setup Guide
Getting started is straightforward. The core logic is pre-packaged in a Google Sheet template. You just need to make a copy and connect it to your own Google Cloud project.
Step 1: Copy the Google Sheet Template
First, make your own personal copy of the Chat Archiver template.
Create a new project. Give it a memorable name (e.g., “My Chat Archiver”).
Enable the Google Chat API:
In your new project, navigate to the “APIs & Services” > “Enabled APIs & services” and enable the Google Chat API and Google Drive API , or Enable the APIs
If you see a message that says Google Auth platform not configured yet, click Get Started
Add an App name and support email
Choose a user type. Internal is best if you’re on a Workspace account. External will work for anyone but require you to add yourself as a test user (you can add up to 100 testers without the need of going through verification).
Click Next.
Under Contact Information, enter an Email address where you can be notified about any changes to your project, then click Next.
Under Finish, review the Google API Services User Data Policy and if you agree, select I agree to the Google API Services: User Data Policy, then click Continue.
In the Apps Script editor, go to Project Settings (the cog icon ⚙️).
Under “Google Cloud Platform (GCP) Project”, paste the Project Number and click Set Project.
Your copy of the sheet is now correctly configured and authorised to make requests to the Chat API on your behalf.
Step 3: Run Your First Archive
Refresh your copied Google Sheet. A new menu named Chat Archiver will appear.
In the Config tab, paste a Google Chat space ID or full room URL and add your email address (you can share your copy of the Google Sheet with other users who will be able to jump to this step).
Click Chat Archiver > Archive All Spaces.
The first time, a dialogue will appear asking for authorisation. Grant the permissions to allow the script to run.
The script will now run, creating both a JSON file and a Google Doc, and will place their links in the corresponding columns in the sheet.
(Optional) Click Chat Archiver > Setup 15-Minute Trigger so setup a trigger to update the archive documents every 15 minutes.
Understanding the Outputs
The script produces two distinct files, each with a specific purpose:
The JSON File: The primary output is a structured JSON file. It takes the chat messages and uses a nested format, which groups replies under their parent message, makes it easier for data analysis with LLMs.
The Google Doc: Alongside the JSON, the script generates a clean Google Doc. This format is perfect as knowledge for a Gem or as a data source in NotebookLM. Crucially, this document is completely regenerated from the JSON data on every run. This means it is a “read-only” artefact; any manual changes will be overwritten.
Important Considerations and Limitations
While this solution is powerful and robust for many use cases, it’s important to understand its design limitations and potential areas for future improvement.
Access is User-Based (By Design) – The script runs with the permissions of the user who authorises it. This means it can only access and archive Google Chat spaces that the user is currently a member of.
Future Improvement: For a true, organisation-wide backup solution, this script could be adapted to use a Service Account. With domain-wide delegation granted by a Workspace administrator, a service account could access any chat space in the domain, regardless of membership. This is a more complex setup but is the standard for enterprise-level automation.
Archives are Text-Only – This solution is focused on archiving the textual content of conversations. It does not save file attachments like images, PDFs, or videos. The JSON data will note that a message contained an attachment, but it won’t contain the file itself.
Data is Append-Only – The script is designed to add new messages to the archive. It does not synchronise edits or deletions. If a message is edited in Google Chat after it has been archived, the JSON file will still contain the original text. If a message is deleted, it will remain in the archive.
Apps Script Execution Limits – Google Apps Script has built-in limits to prevent abuse.
Execution Time: A single script run is limited to 6 minutes for standard Gmail accounts or 30 minutes for Google Workspace accounts. For an exceptionally large space (many hundreds of thousands of messages), the very first archive could potentially time out. Using the “Archive Start Date” field is the best way to manage very large initial backfills.
File Size: There is a 50 MB limit on the size of a data blob that Apps Script can create. As the JSON archive grows, a single file may eventually hit this limit. For extremely large spaces, the script could be modified to create new files on a yearly or quarterly basis.
Not a Compliance Substitute for Google Vault – For organisations that require eDiscovery, legal holds, and retention policies for compliance reasons, Google Vault is the official, authoritative tool. This script should be seen as a powerful data extraction and analysis tool, not a substitute for an official compliance solution.
Ideas for Your Archive
Now that you have your complete chat history in a structured format, what can you do with it? Here are a few ideas to get you started:
Create a Project FAQ with Gemini: Provide the generated Google Doc or JSON file to Gemini and ask it to synthesise a “Frequently Asked Questions” document about a specific project. It can pull out key decisions, find links to important resources, and identify common questions your team has answered.
Generate an Infographic Summary: Use a prompt like, “Based on this JSON data, identify the top 5 most active members, the busiest day of the week, and the main topics discussed. Present this as data for an infographic.” You can use the Gemini App ‘canvas’ to create a webpage or feed the structured output into a design tool.
Onboard New Team Members: Give a new team member the Google Doc archive and ask Gemini to act as a project expert. They can ask questions like, “What was the final decision on the ‘Phoenix’ feature?” or “Summarise the key discussions from last March,” and get instant, context-aware answers.
Perform Topic and Sentiment Analysis: The structured JSON file is perfect for programmatic analysis. You could ask Gemini to write a simple script (or use a Colab notebook) to parse the messages, perform sentiment analysis over time to track team morale, or use natural language processing to identify recurring topics and pain points.
Build a Project Timeline: Ask Gemini to scan the archive for key dates, deadlines, and project milestones mentioned in the chat, then format the results as a timeline or a table that you can use for project retrospectives and reports.
Summary
Ultimately, this tool is about providing an easy way for you to unlock the value hidden in your team’s conversations. By moving beyond the current limitations and including every message, you create a better true source of truth for analysis and reporting. While we hope future updates to Gemini for Workspace will make this kind of deep integration seamless, for now, this solution gives you more control over your data and a process you can experiment with. I hope this guide helps you get started quickly and if you would like to explore enterprise level solutions get in touch.