Let’s take our UI to the next level with Tailwind CSS!
Introduction
In the previous article, we learned how to bundle NPM modules with Vite. Today, we’re going to add some style with Tailwind CSS. If you’ve been following my series, you’ll breeze through this like a true professional. 🚀
Check out the part-03 branch in the Github repository for the full source code.
What Is Tailwind CSS
Tailwind CSS is a utility-first CSS framework that makes styling a breeze. Think of it like a wardrobe filled with every piece of clothing that you’ll ever need, with everything neatly organized and ready to go. 💃🕺
Hey there, friends! 👋 Our Emojibar — yes, that’s what we’re calling it now — is coming along nicely! In the previous post, we learned how to bundle the project with Vite and vite-plugin-singlefile, and it’s now time to add some real functionality!
To complete our Emojibar, we’ll use two NPM modules:
Unicode-Emoji-JSON: We need a complete list of emojis, and this simple module provides them in JSON format. Perfect!
ToastifyJS: When users click on an emoji, it’ll be copied into their buffer. Just so they have some feedback, we’ll show them a confirmation toast. This library is great for this purpose.
We’ll also add search and navigation functionality, meaning that we’ll have the entire backbone of the application ready by the end of this post.
Last week, we talked about the best way to build front-ends for Google Apps Script. Today, let’s roll up our sleeves and dive in! 😎
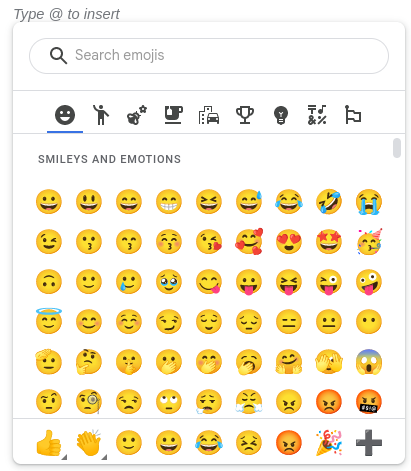
As I mentioned in my previous post, we’re going to create a super cool sidebar in Google Sheets that’ll help us select emojis with ease. 😎 Google Docs already has this functionality natively: simply head over to the “Insert” menu, select “Emoji,” and voilà! You’ll see a neat dialogue window with all emojis organized by category, as well as a handy search function:
However, we want more, so, we’ll be building our own version. 😏 Unlike Docs, we’ll have a full sidebar to work with, and clicking on an emoji won’t automatically insert it. Instead, it’ll copy it into our buffer, so we can paste it wherever we need it. 🎉
That being said, let’s dive into using our most important tool: Vite. ⚡
Welcome to the Ultimate Google Ultimate Google Apps Script Front-End Development Guide!
If you are reading this post, then you likely have experience with Google Apps Script. Essentially, there are three types of front-ends that you can create with Apps Script:
Web apps
Modal/modeless dialogues
Sidebars
In this blog post series, we will only discuss HTML front-ends, as this is where you can create the most powerful and sophisticated user experiences. Unfortunately, the Card Service is outside the scope of this series, and it is not nearly as powerful as an HTML front-end. With that in mind, Google, how about allowing HTML front-ends for Workspace add-ons?
Google Apps Script is a JavaScript-based language that has access to Google Workspace-specific libraries for Gmail, Google Sheets, Google Forms, Google Drive, etc., and allows you to quickly and efficiently automate your tasks and program business applications.
A lot of users try and quickly learn GAS and use it to make their lives easier. It’s all great, however the code we sometimes tend to come across on StackOverflow and other sites lacks best practices, hence I thought it was time to start bringing them up and I will start today with design patterns.
I’m all for copy/paste coding and it one of the things I love about the Google Apps Script developer community, there are lots of great snippets out there and in Pulse we’ve now over 800 posts and counting. When you start going beyond quick script solutions into more complex projects investing time planning how you’ll structure your code can save you headaches and frustrations further down the line.
Using design patterns are one way to produce better code that is more readable which in turn is more maintainable and can lead to faster development. This post from Dmitry Kostyuk a nice opportunity to learn about a design pattern for a very common use case of maintaining data in a Google Sheet from a third party API.
ChatGPT is pretty much a universal API: one endpoint to get any data.
ChatGPT has recently taken the world by storm. Unless you have been living under a rock, then you have certainly seen a variety of content on this topic. One of its greatest advantages is its ease of use, and it is perfectly usable in Google Apps Script. With that in mind, here is one use case that we can implement: generating fake data.
Fake data is useful for testing purposes. At times, real data is too sensitive, and sometimes you do not have access to real data before production, but you need to begin working with something. Here is where fake data comes in.
We used to have a great library for fake data called Faker.js; however, Marak, the author, became so frustrated that he could not monetize the solution that he pushed an update that broke everything, which led to him being blocked on GitHub and NPM. As a result, the library is no longer maintained. ChatGPT, however, is not going anywhere.
Illustration by ahmiruddinhidayat111198 on freepik.com https://www.freepik.com/author/fahmiruddinhidayat111198
The onEdit trigger is likely the most used trigger in Google Apps Script. It runs automatically with an event object whenever you change a value in a spreadsheet — programmatic changes excluded — thus allowing you to execute a script based on context. When done properly, it can be extremely powerful. When done wrong, however, it can feel unreliable and messy.
In this article, we will learn to avoid three common pitfalls:
Not Exiting Early
Making a Single Function Do Everything
Expecting onEdit to Catch All Changes by Default
For this purpose, we will build a simple script to handle a task list in Google Sheets. It will do two things: add a checkbox next to new tasks and add a completion date when each task is checked as done.
When working in a team and/or with a client, you want to have multiple environments. At minimum, you probably want a dev environment (or multiple ones) in which you are working, and a test environment in which the client or your team can run acceptance tests before production. Of course, they must both be separate from the production environment. To push your code to the correct environment, you need to either update the .clasp.json file manually or keep multiple copies of your script with different .clasp.json files. Fortunately, things have just become significantly easier, as I recently built an app for this purpose called clasp-env, which is available on NPM. See the source link for details.
No Google Apps Script SDK for your favorite API? No problem!
I’ve never seen a Google Apps Script SDK made available as part of an API, as, surprise surprise, it’s not the most popular choice for professional development. It’s time to start changing that, so we will learn to build our own!
[Editor note: Really impressive work from Dmitry providing a framework you can use to develop your own service for interacting with 3rd party APIs. The post includes lots of clear instructions and guidance to help you understand and learn about approaches for structuring your Google Apps Script code projects]
When it came out, the new Google Apps Script IDE was, of course, a big deal. It’s way better than the legacy one. It brought syntax highlighting, keyboard shortcuts, command palette and just a much better UI experience.
In fact the reason it’s so good is that it’s built on top of VS Code Monaco editor. But it’s definitely still far away from what a real VS Code installation can do. You can get all the functionality of the online IDE and much more more: autocomplete, custom themes, installation of modules, linting, snippets, etc.